Jira & Confluence Custom GPT
Connect ChatGPT with your Atlassian workspace
📋 What is This?
This service allows you to use ChatGPT to interact with your Jira and Confluence workspaces using natural language. No coding required! Just talk to ChatGPT like you would to a colleague.
Examples of what you can do:
- "List all my Jira projects"
- "Create a user story for login feature"
- "Find Confluence pages about API documentation"
- "Add a sequence diagram to the payment flow page"
🎬 See It In Action
Here's a complete workflow showing how you can use the Custom GPT to create user stories, add them to Jira, and generate Confluence documentation with Mermaid diagrams:
1️⃣ Input Requirements → Generate User Stories
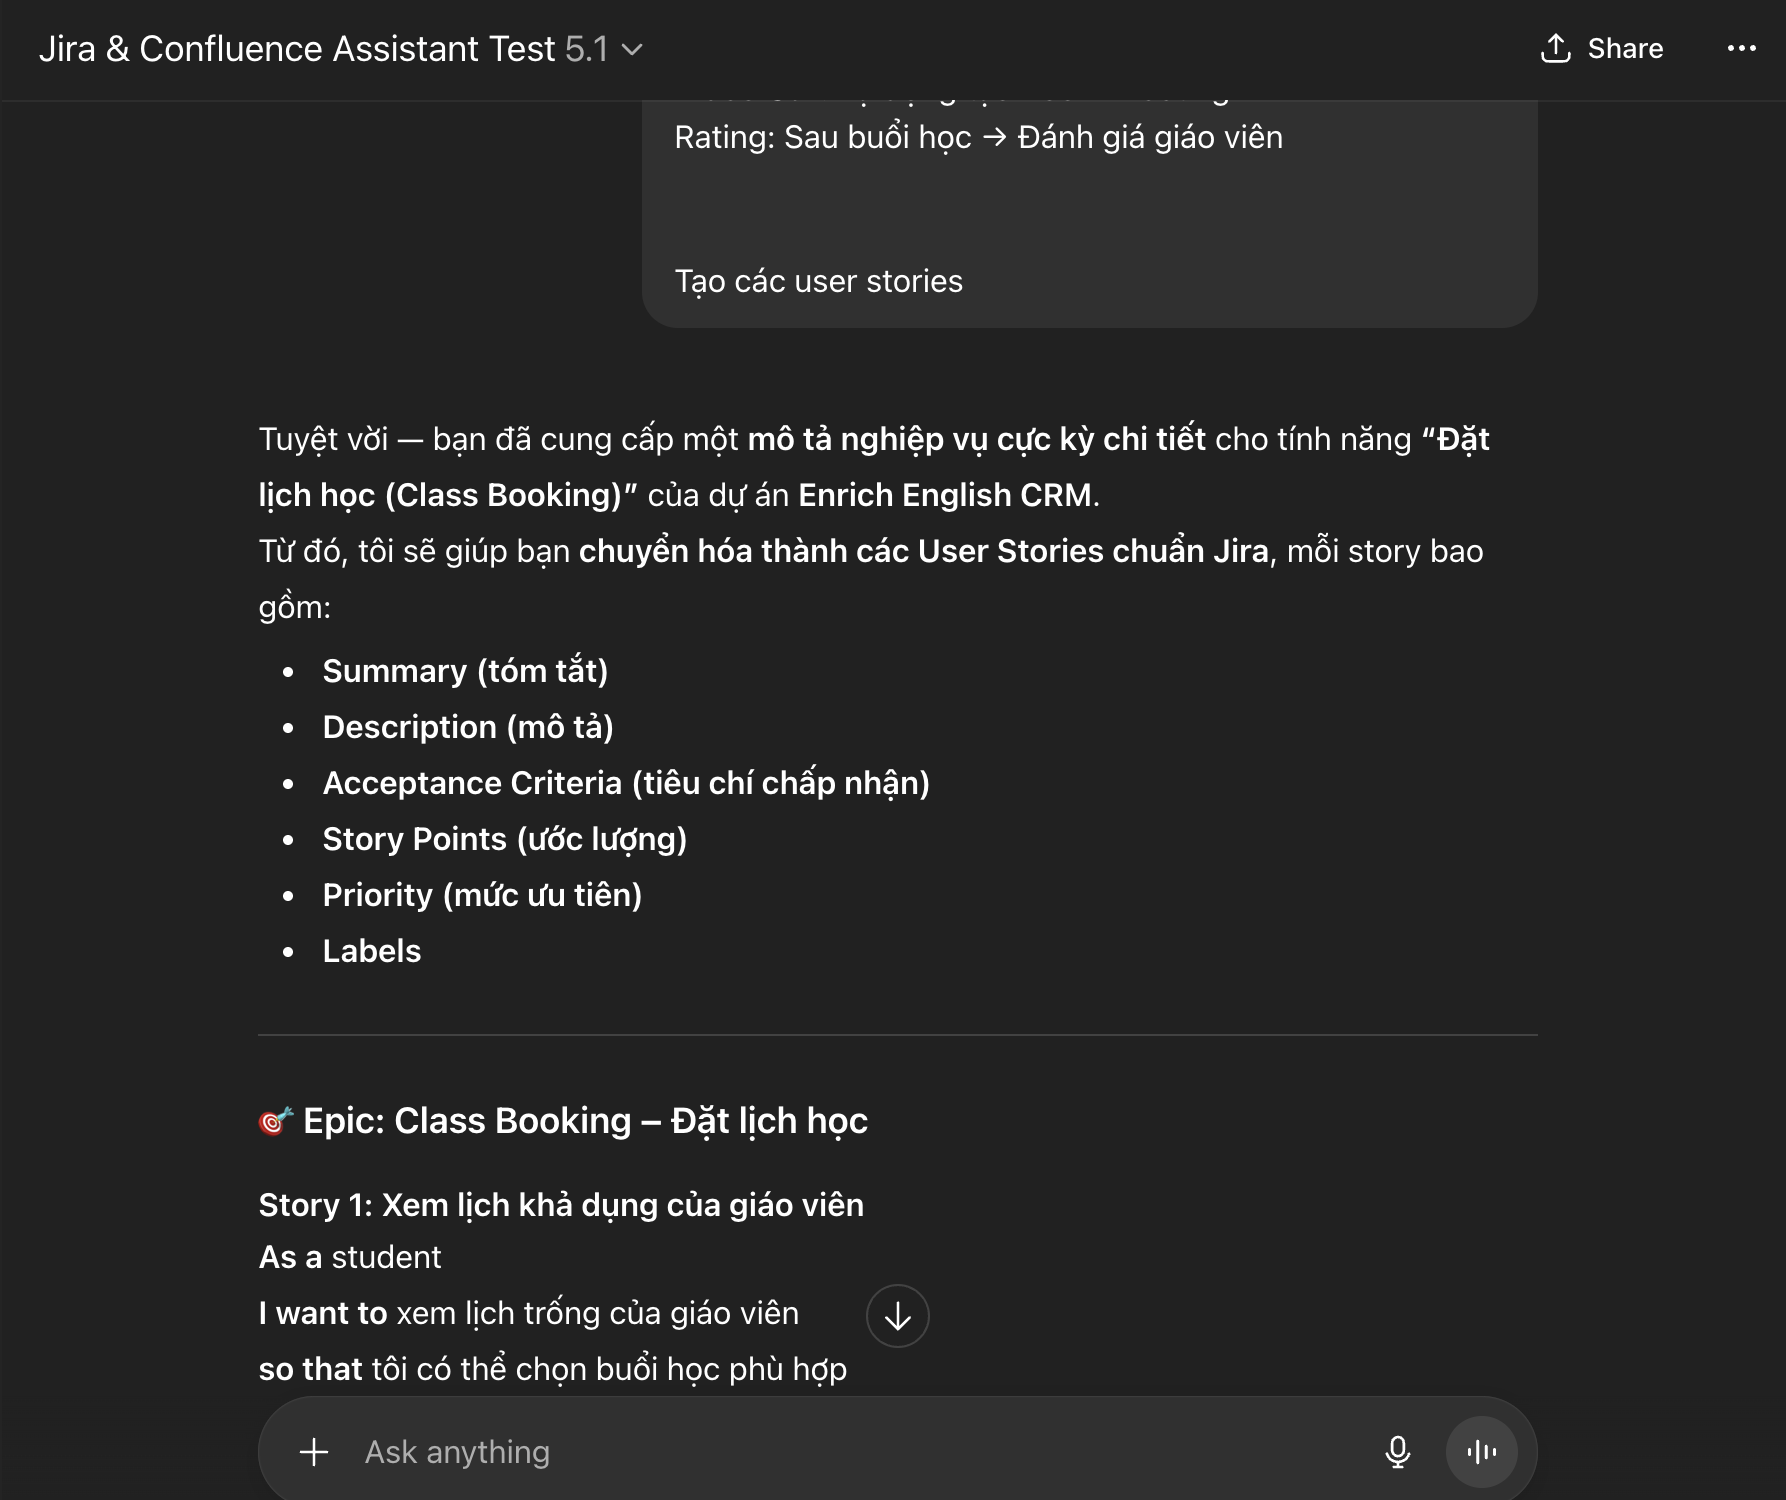
Simply describe your feature in natural language and the GPT generates structured user stories with all necessary fields (Summary, Description, Acceptance Criteria, Story Points, Priority, Labels).
2️⃣ Create Jira Tickets → Generate Confluence Documentation
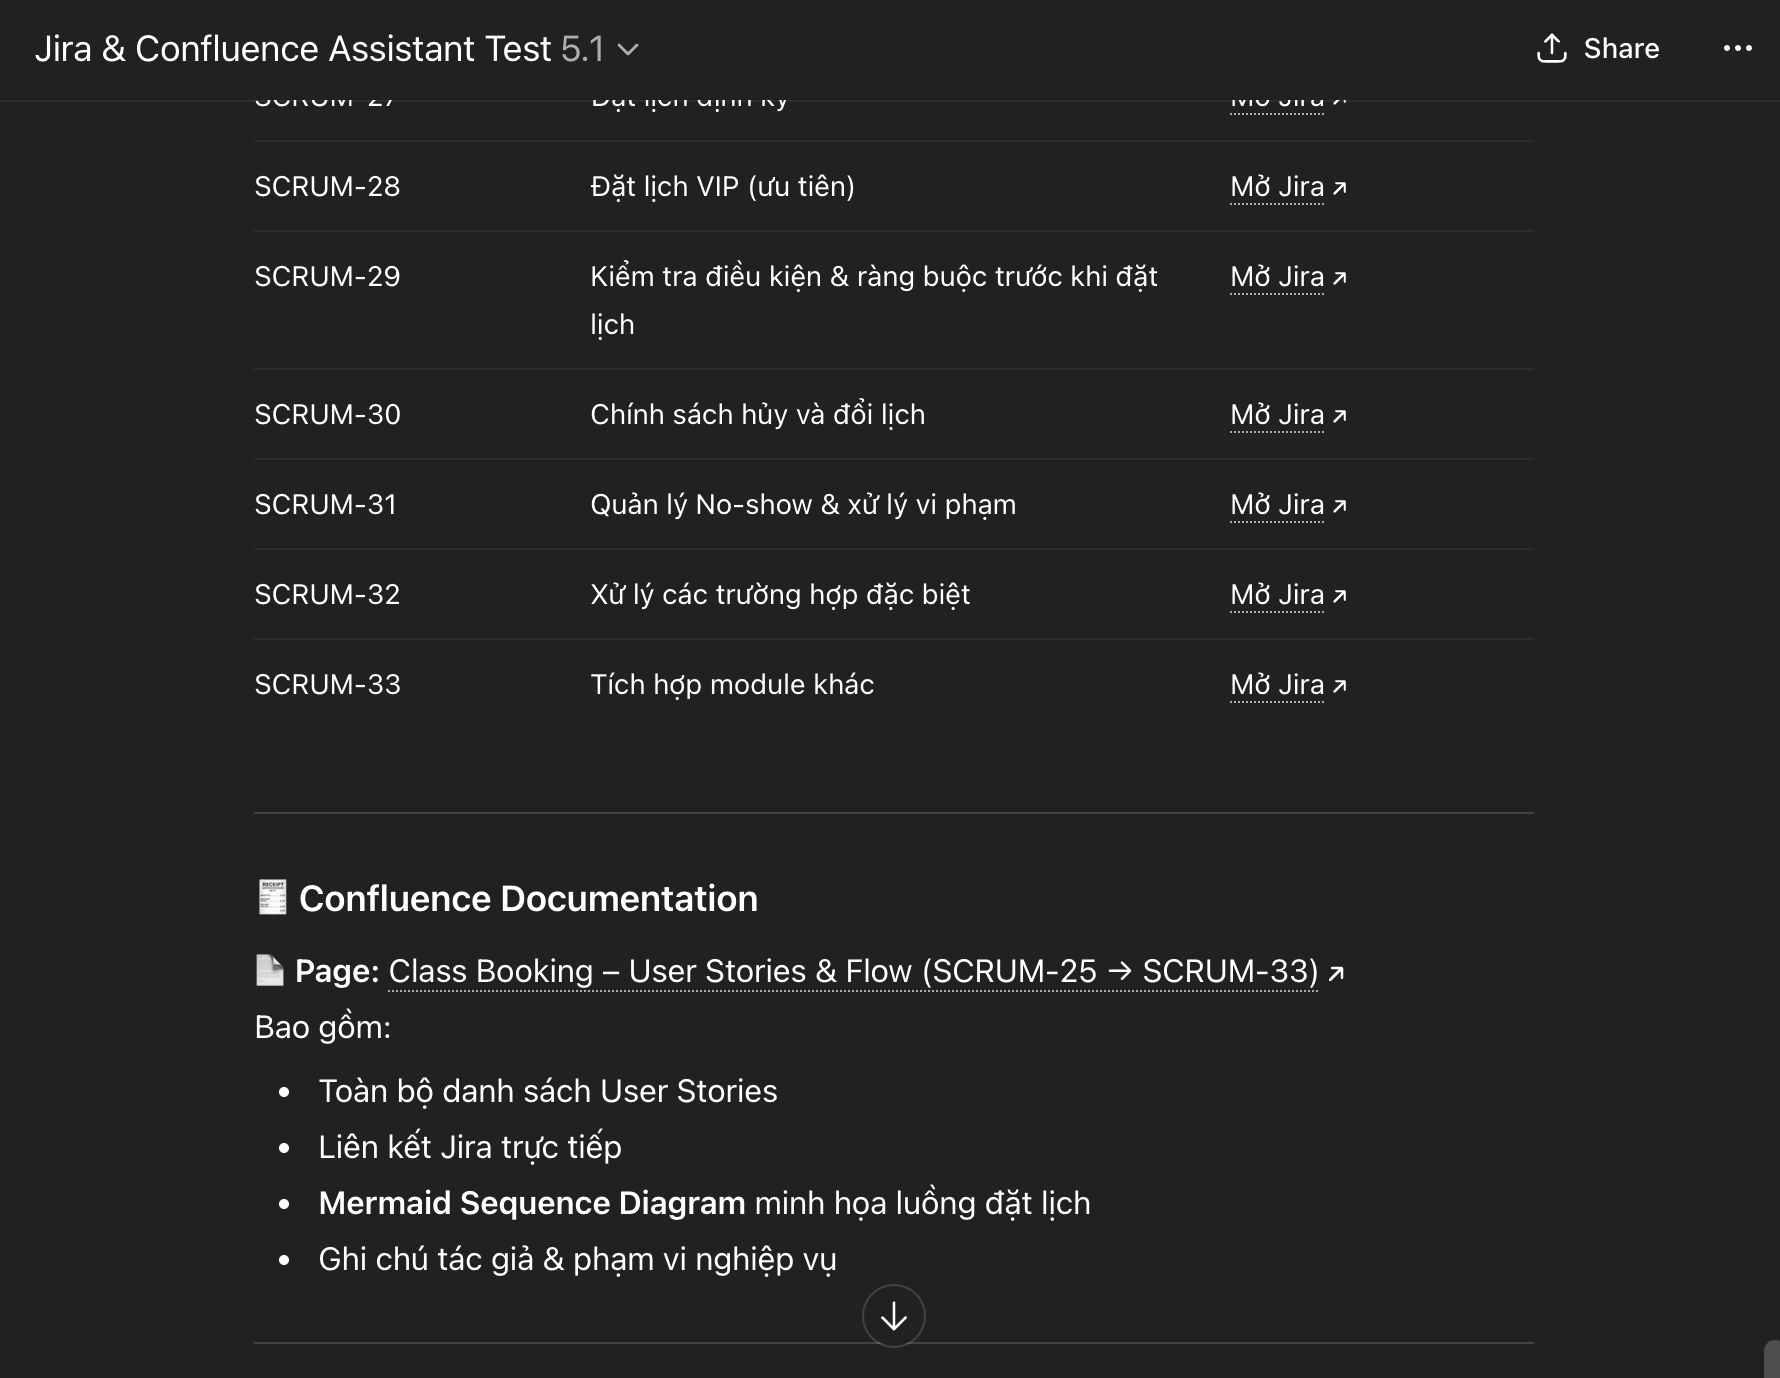
After creating the Jira tickets, the GPT can automatically generate a Confluence page that links all related tickets and includes the necessary documentation.
3️⃣ Final Result: Confluence Page with Mermaid Diagram
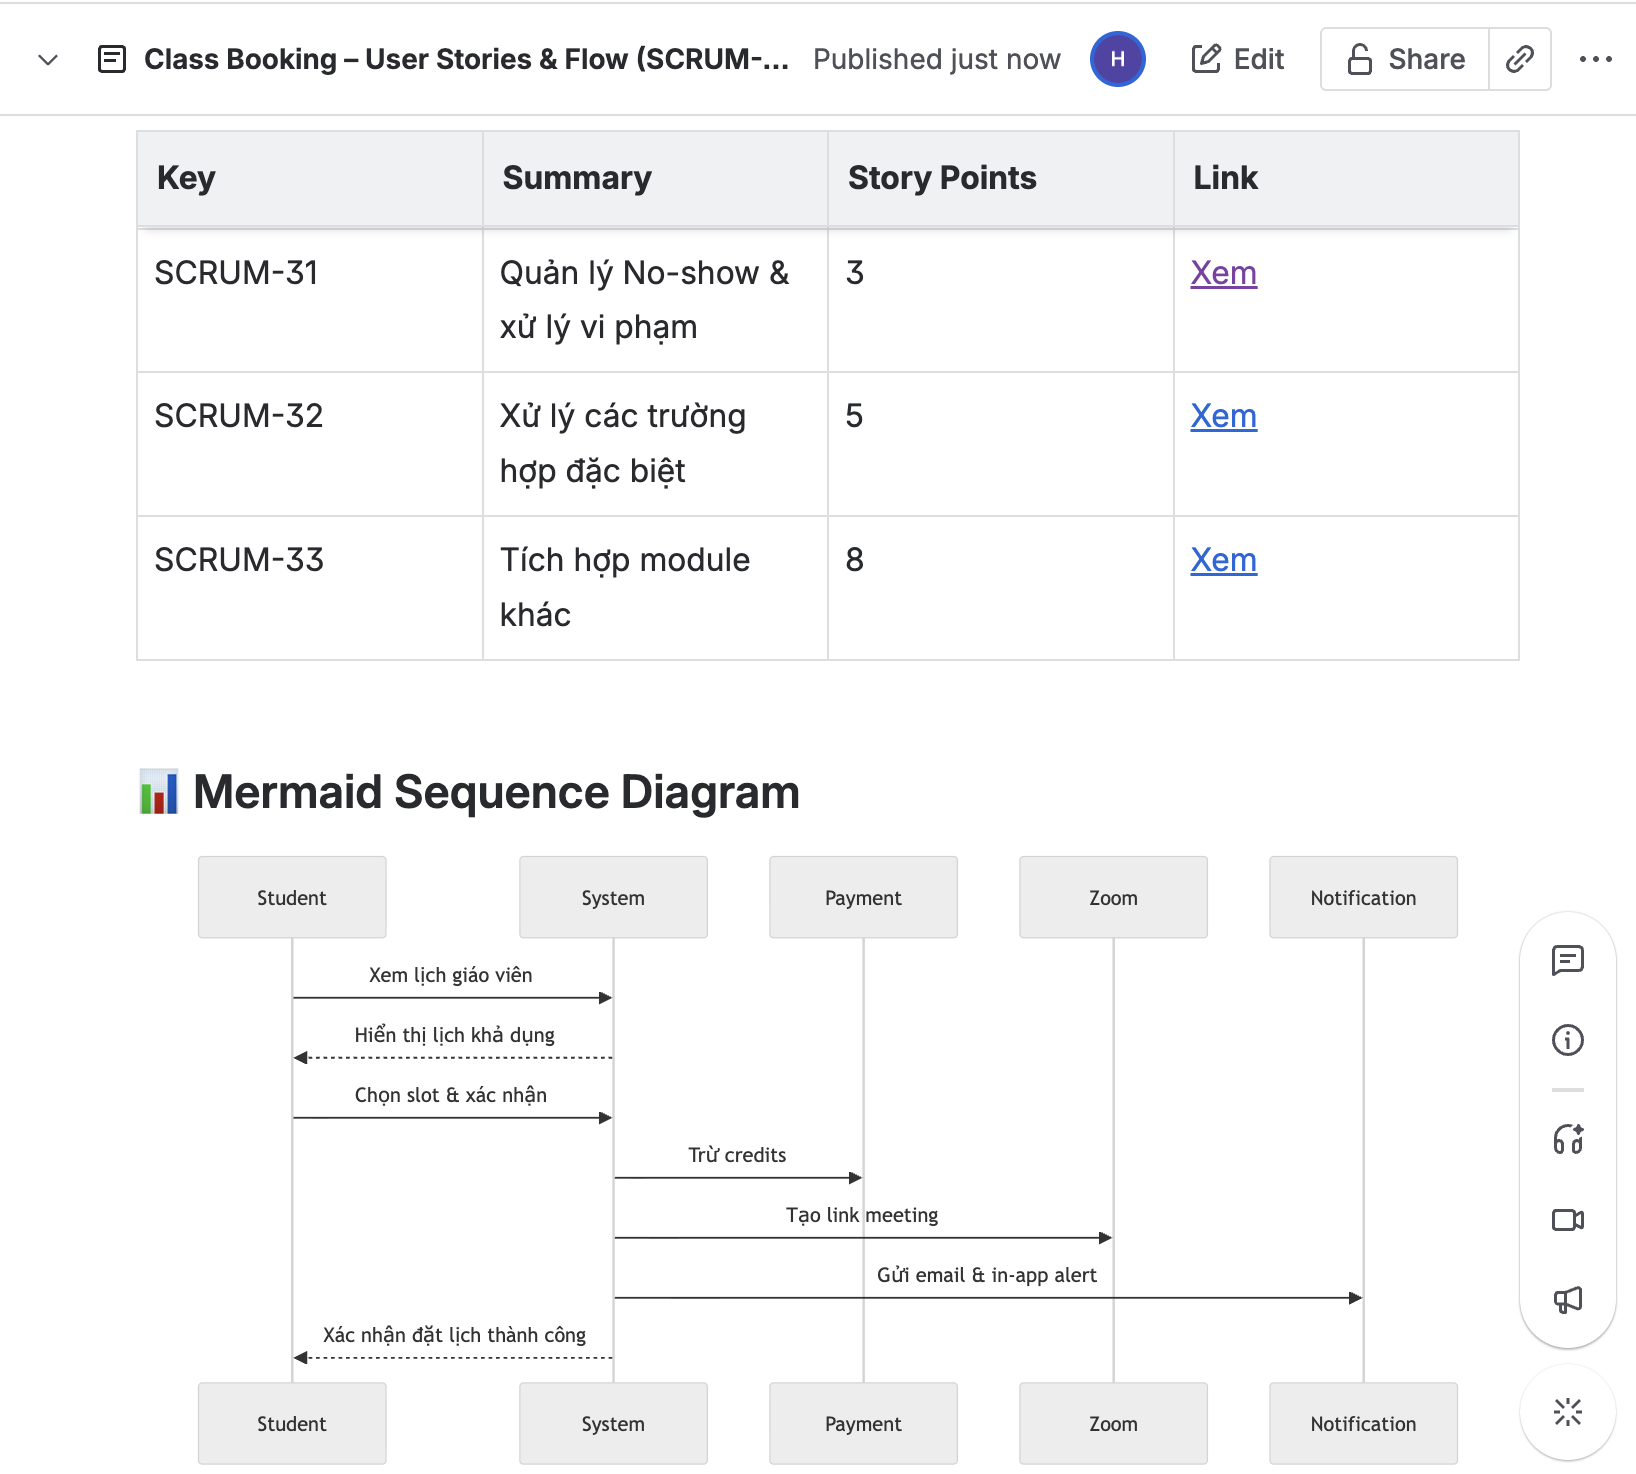
The final Confluence page includes a table summarizing all user stories with direct links to Jira tickets, plus a fully rendered Mermaid sequence diagram visualizing the workflow.
⚡ Time saved: What used to take hours of manual work (creating tickets, writing documentation, drawing diagrams) now takes just a few minutes with natural language prompts!
🏗️ How It Works
Here's the architecture of how Custom GPT communicates with your Atlassian workspace:
┌─────────────────┐
│   Custom GPT    │  ← You chat using natural language
└────────┬────────┘
         │ JSON over HTTPS
         │ Header: X-API-Key
         ▼
┌─────────────────┐
│  Middleware API │  ← Next.js API on Vercel
│                 │
│  ┌───────────┐  │
│  │ Endpoints │  │
│  └─────┬─────┘  │
│        │        │
│  ┌─────▼──────┐ │
│  │  Services  │ │  ← Business logic
│  └─────┬──────┘ │
└────────┼────────┘
         │
    ┌────▼─────┐
    │ Atlassian│
    │   APIs   │
    └──────────┘
🔒 Security: Your API key (X-API-Key header) ensures only your Custom GPT can access your middleware. The middleware then securely communicates with Atlassian using your API token.
🚀 Complete Setup Guide
- A GitHub account (free - we'll show you how to create one)
- A ChatGPT Plus or Team subscription (required to create Custom GPTs)
- Access to Jira and/or Confluence (with permission to create API tokens)
Step 0: Create a GitHub Account (If You Don't Have One)
Already have a GitHub account? Skip to Step 1.
New to GitHub? It's free and easy! Visit github.com/signup and follow the prompts to create an account with your email, password, and username. You'll need to verify your email address.
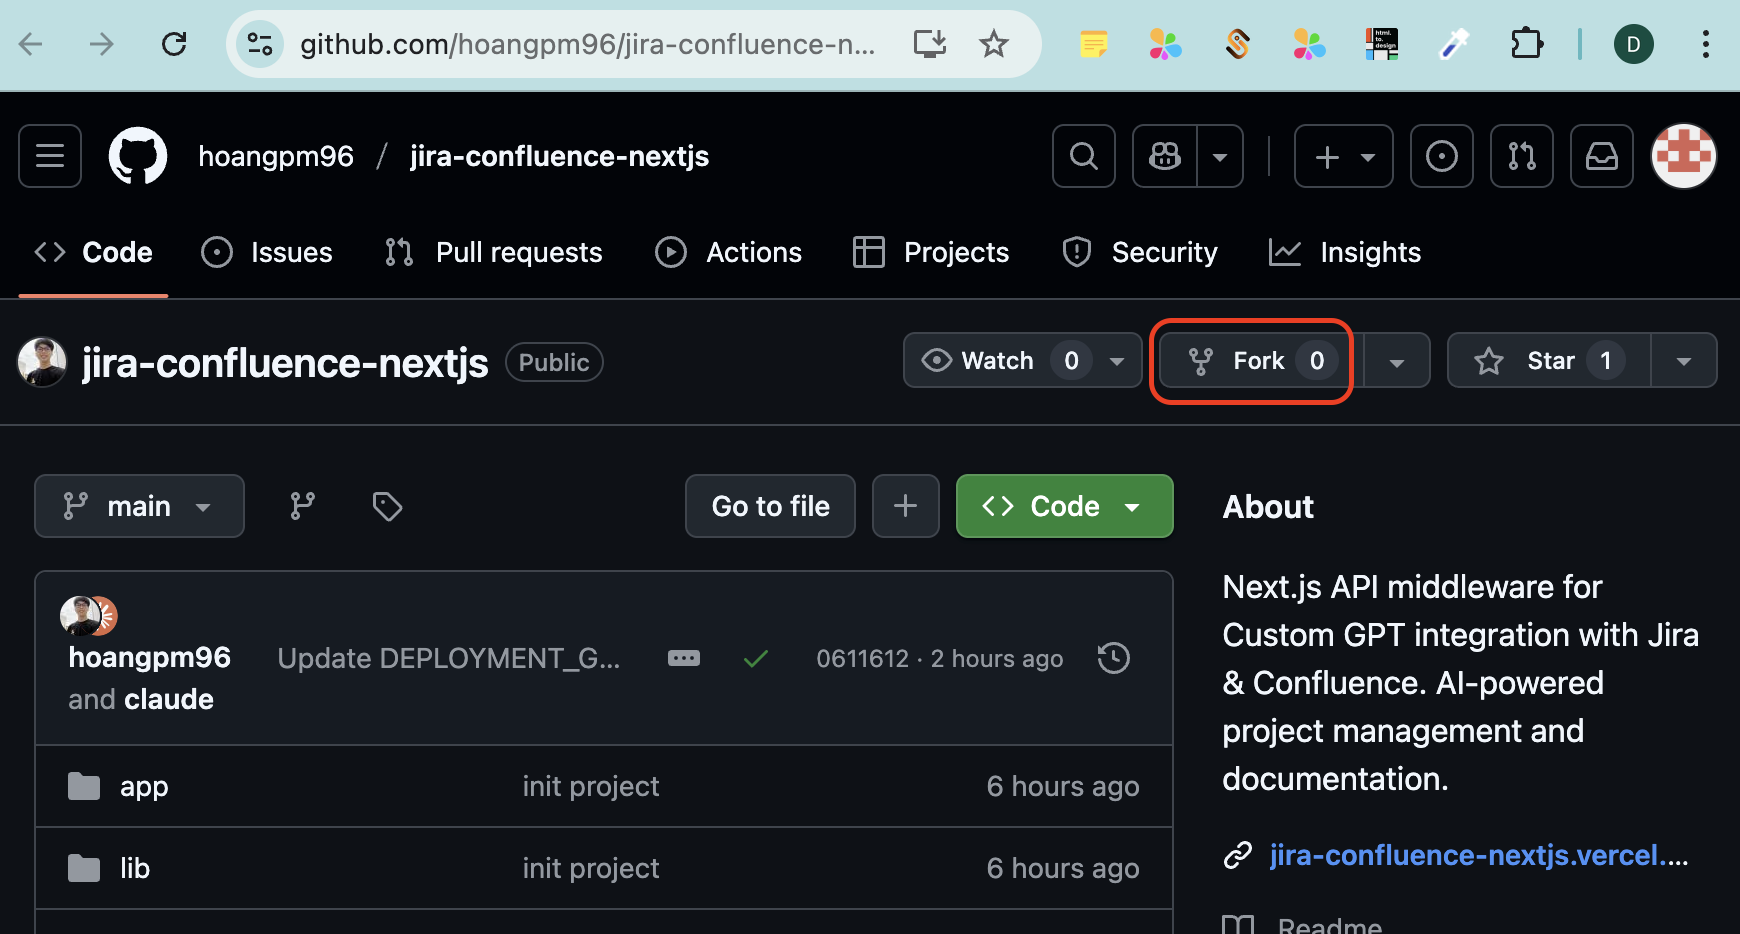
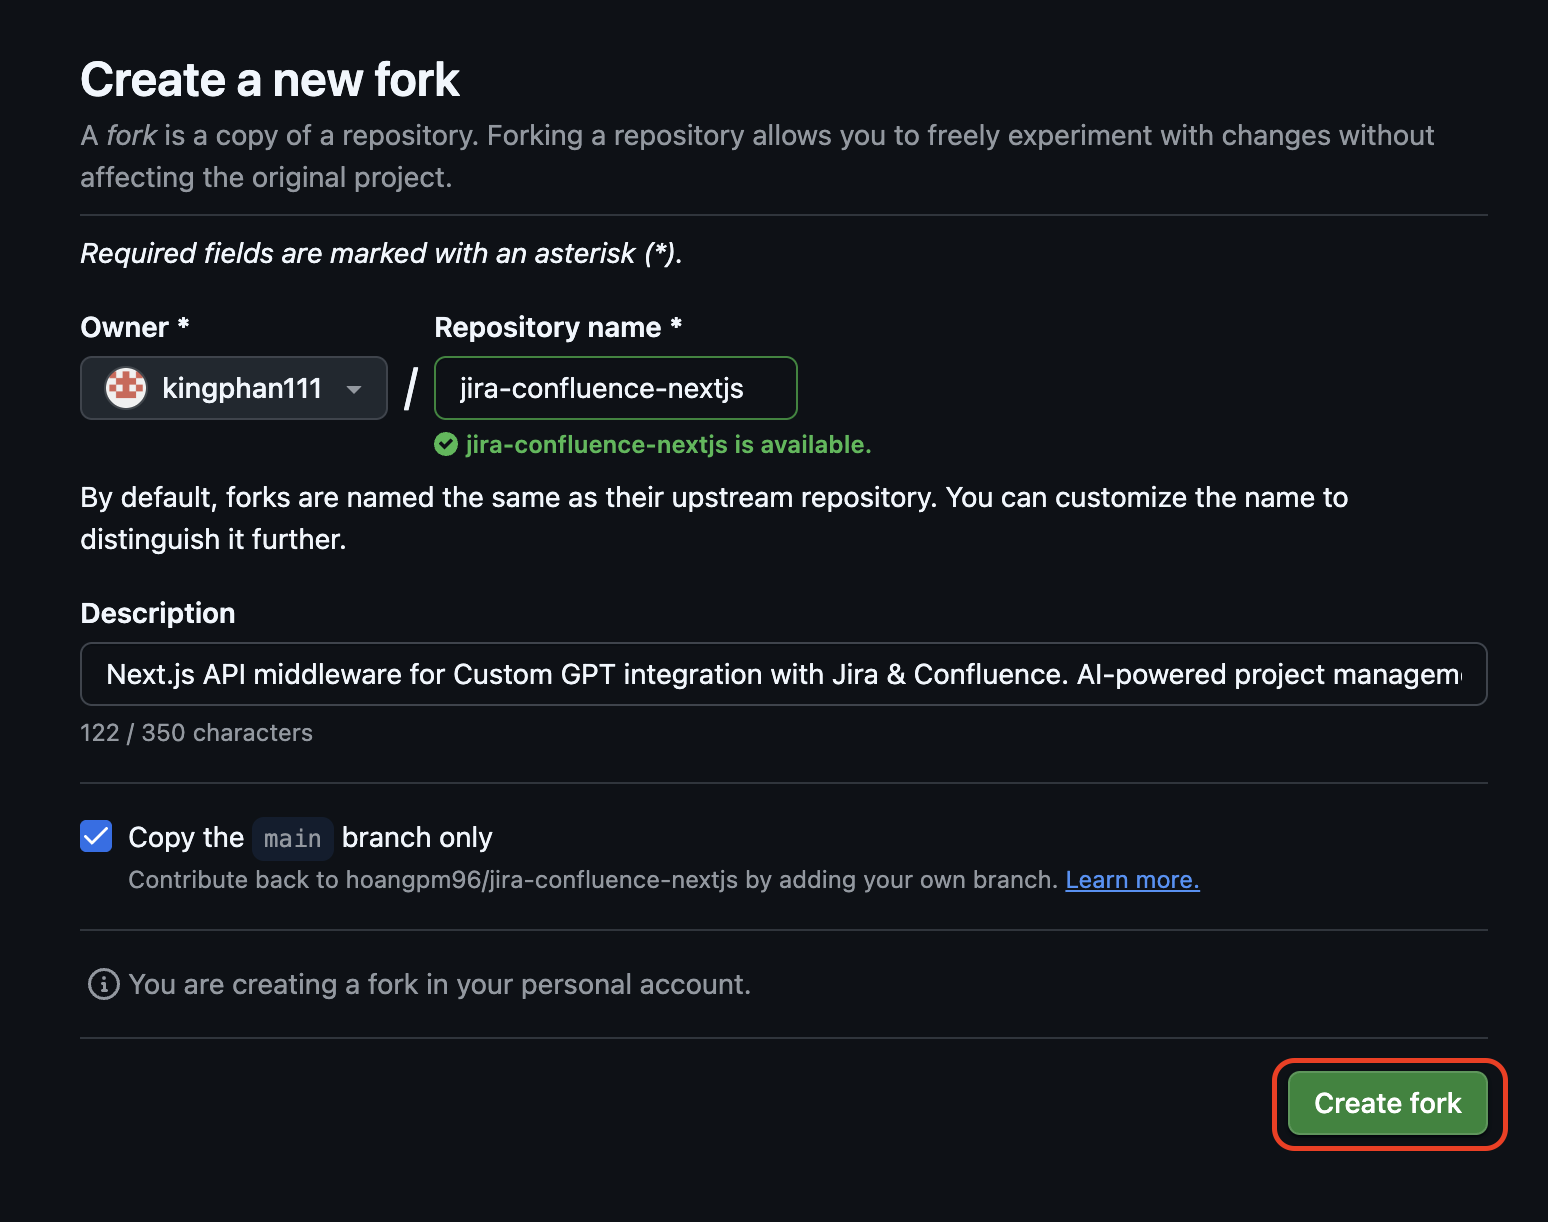
Step 1: Fork the GitHub Repository
Why fork? Forking creates your own copy of the project that you can deploy and customize.
📸 Detailed Instructions:
- Go to the GitHub repository:
https://github.com/hoangpm96/jira-confluence-nextjs - Click the "Fork" button in the top-right corner of the page
(It's next to the "Star" button) - On the "Create a new fork" page:
- Keep the repository name as
jira-confluence-nextjs(or rename if you want) - Add a description (optional): "My Jira & Confluence Custom GPT"
- Make sure "Copy the main branch only" is checked
- Keep the repository name as
- Click the green "Create fork" button
- Wait a few seconds - GitHub will create your fork and redirect you to your new repository
Your repository URL will be:github.com/YOUR-USERNAME/jira-confluence-nextjs
Step 2: Get Your Atlassian Credentials
You need 3 pieces of information:
- Your Atlassian domain (e.g., yourcompany.atlassian.net)
- Your email address (the one you use to login to Jira/Confluence)
- An API token (we'll create this now)
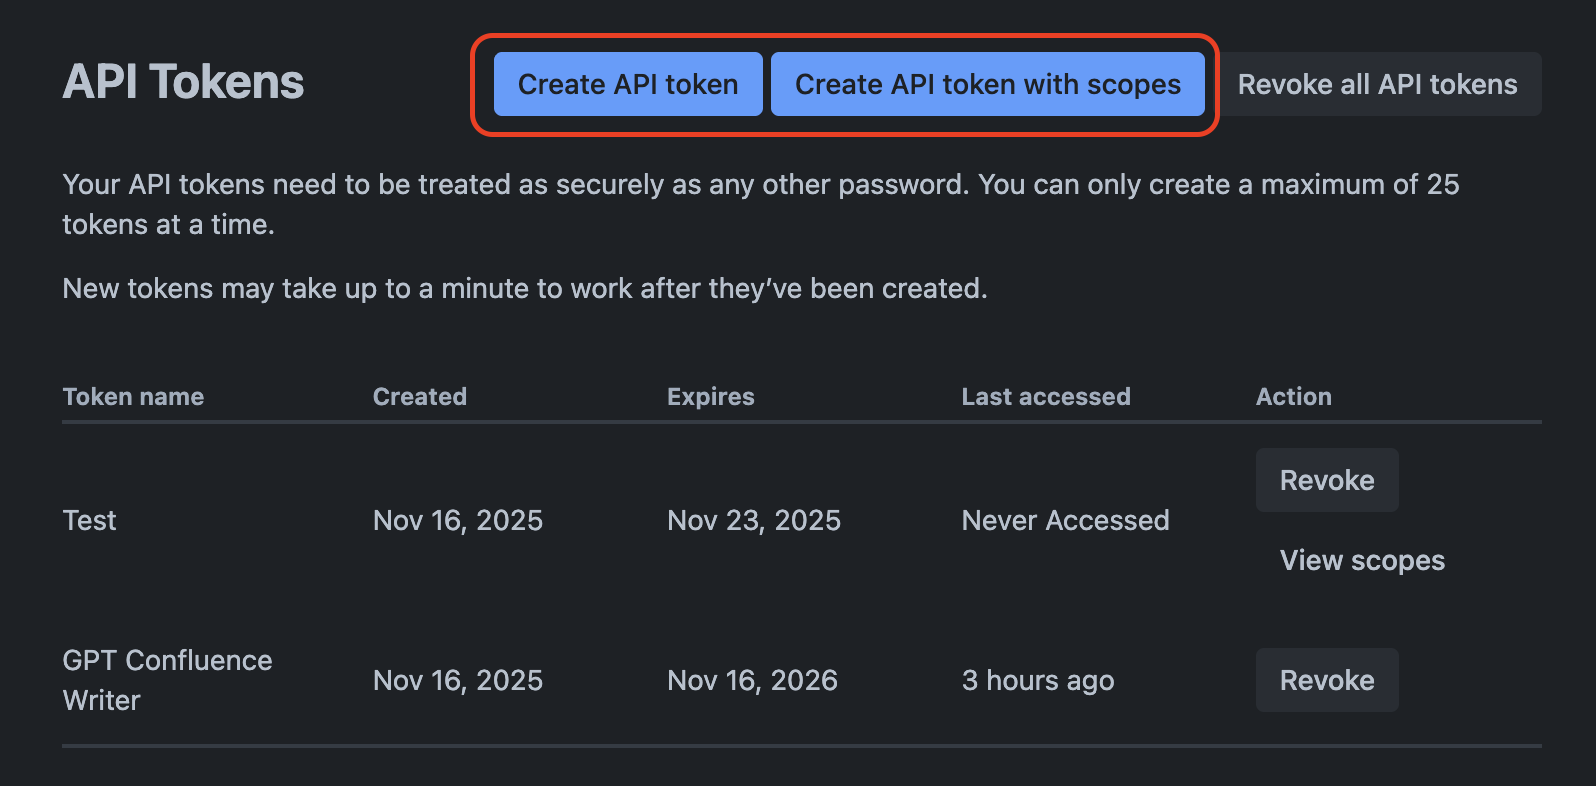
📸 Creating Your API Token:
- Go to Atlassian API Tokens page:
https://id.atlassian.com/manage-profile/security/api-tokens
(You'll need to login with your Atlassian account) - Choose how to create your API token:
Two options available:
- "Create API token" - Grants full access to all Jira and Confluence resources.
✅ Recommended for simplicity and full functionality - "Create API token with scopes" - Allows you to limit permissions to specific resources.
⚠️ Advanced option - use only if you need restricted access
- "Create API token" - Grants full access to all Jira and Confluence resources.
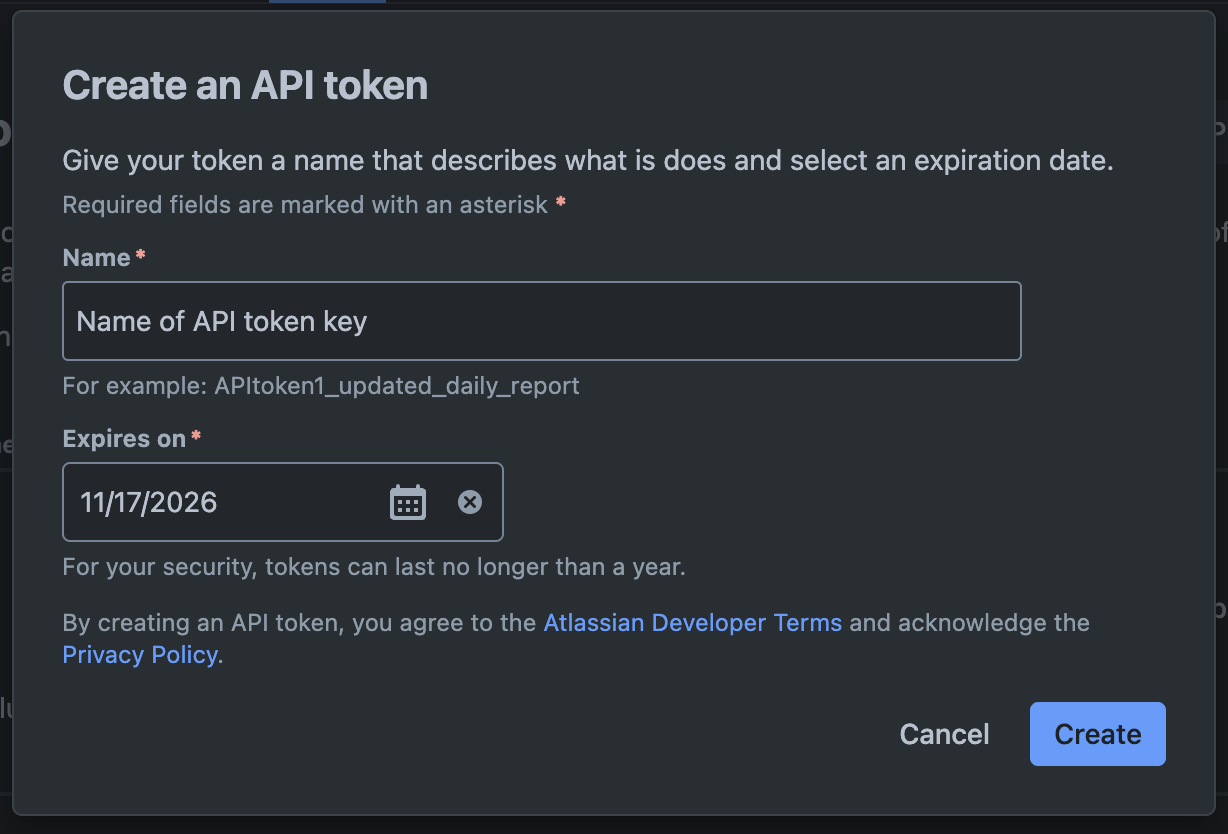
- Fill in the token details:
- Name: Enter a descriptive name like
ChatGPT IntegrationorGPT Confluence Writer
This helps you identify what this token is used for - Expires on: Set an expiration date (maximum 1 year from now)
For security, tokens can last no longer than a year. Choose a date that works for you.
Then click the blue "Create" button at the bottom right.
- Name: Enter a descriptive name like
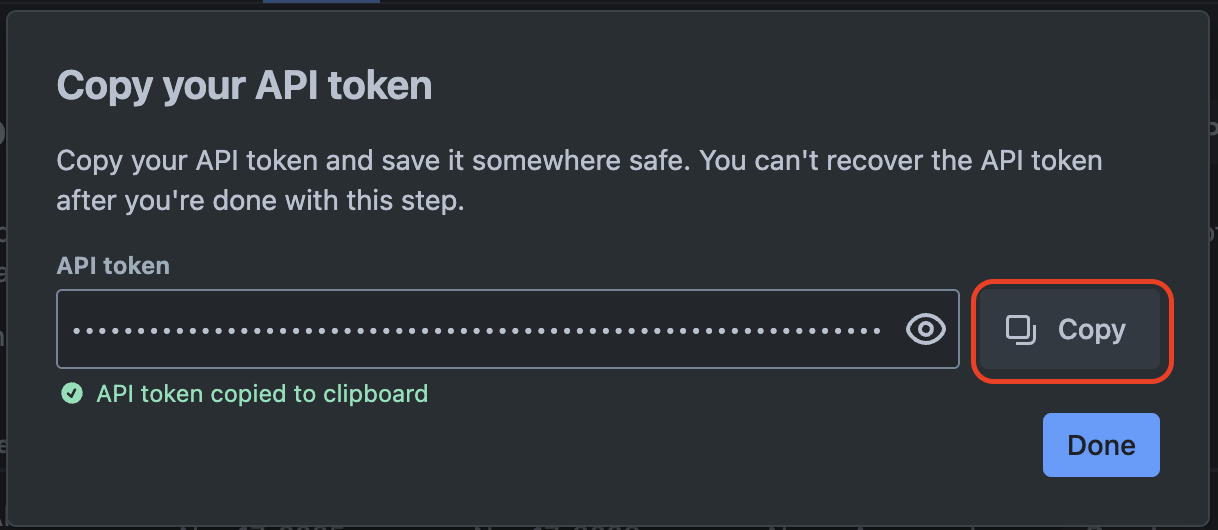
- Copy your API token immediately!⚠️ Important: You won't be able to see this token again! Copy it now and save it somewhere safe (like a password manager or notes app).
Click the "Copy" button to copy your token to the clipboard, then save it somewhere secure.
- Note your Atlassian domain:
This is the URL you use to access Jira/Confluence. For example:- If you access Jira at
https://mycompany.atlassian.net/jira - Your domain is:
mycompany.atlassian.net
- If you access Jira at
Step 3: Deploy to Vercel (Free & Easy)
Vercel provides free hosting for Next.js apps - perfect for this project!
📸 Deployment Steps:
- Go to Vercel and sign up: vercel.com
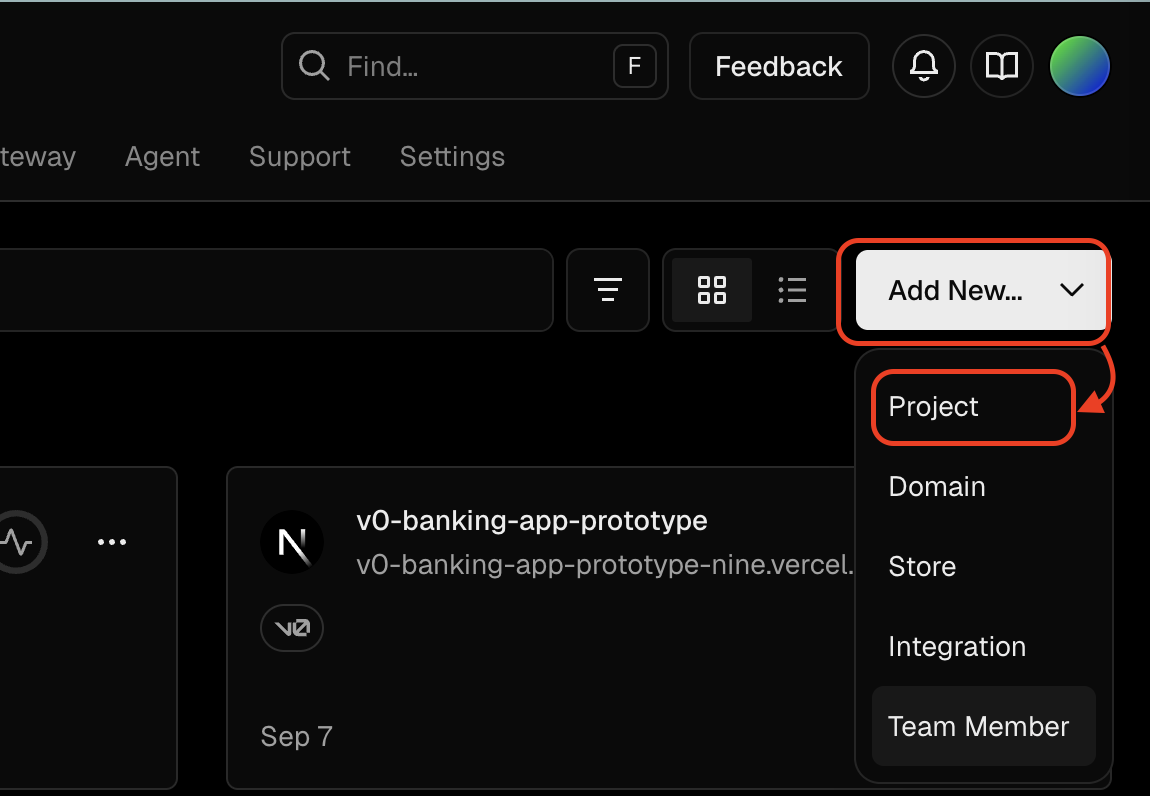
Create an account (you can use GitHub, GitLab, Bitbucket, Google, or email). - Create new project: Click "Add New..." → "Project"
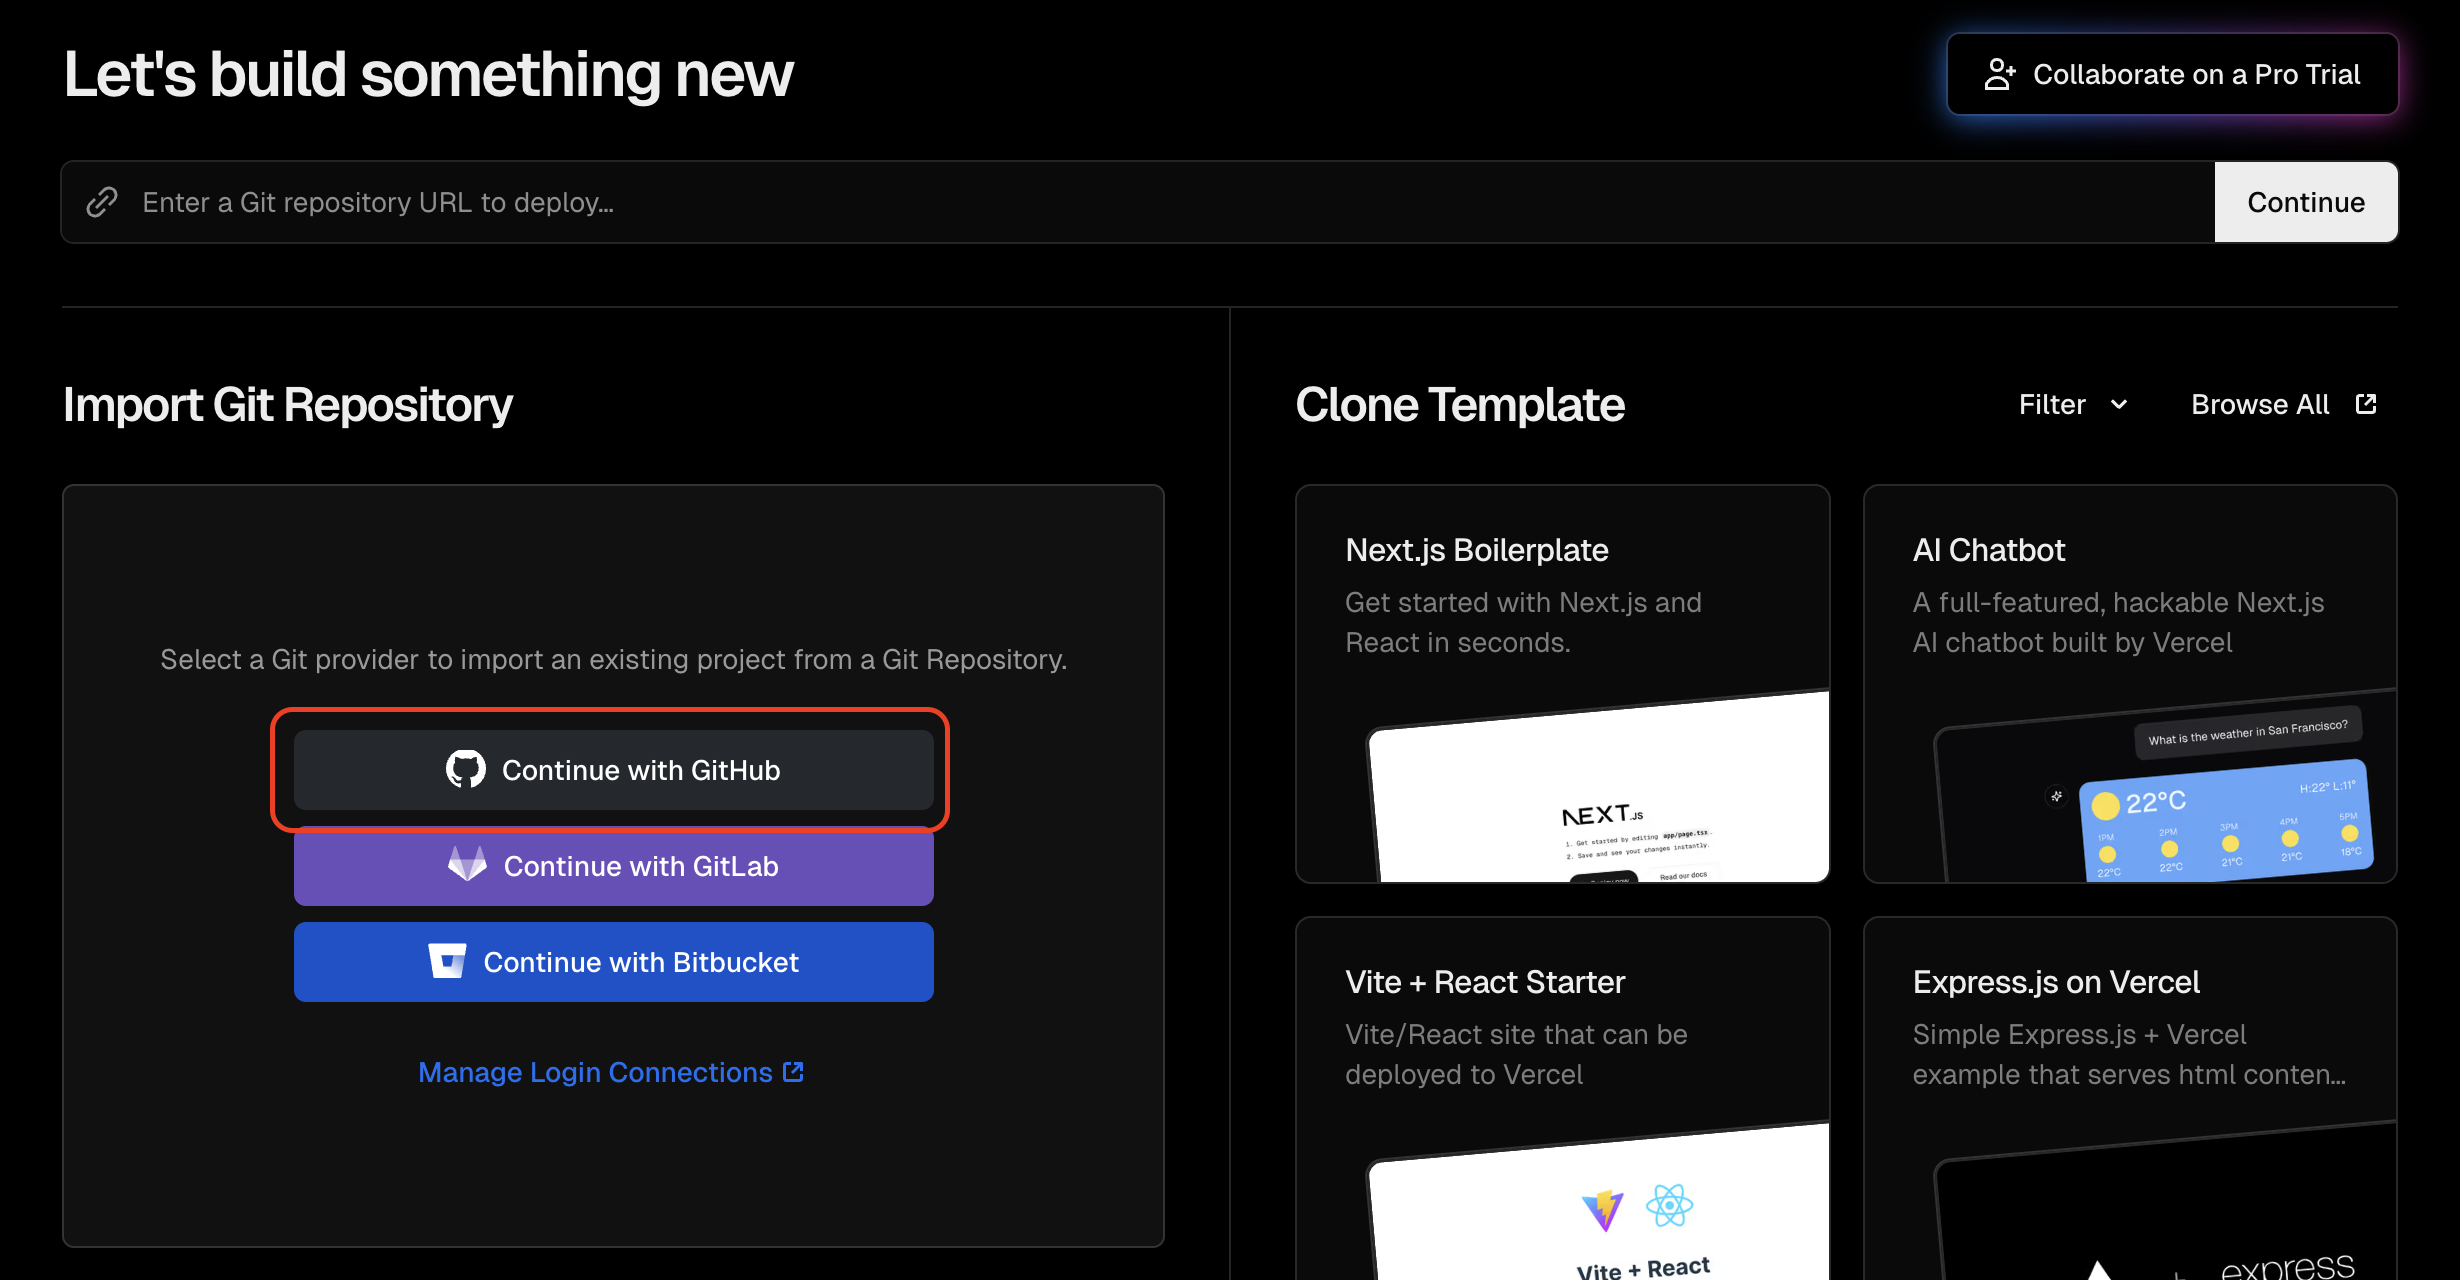
- Connect to GitHub: Click "Continue with GitHub" to connect your GitHub account
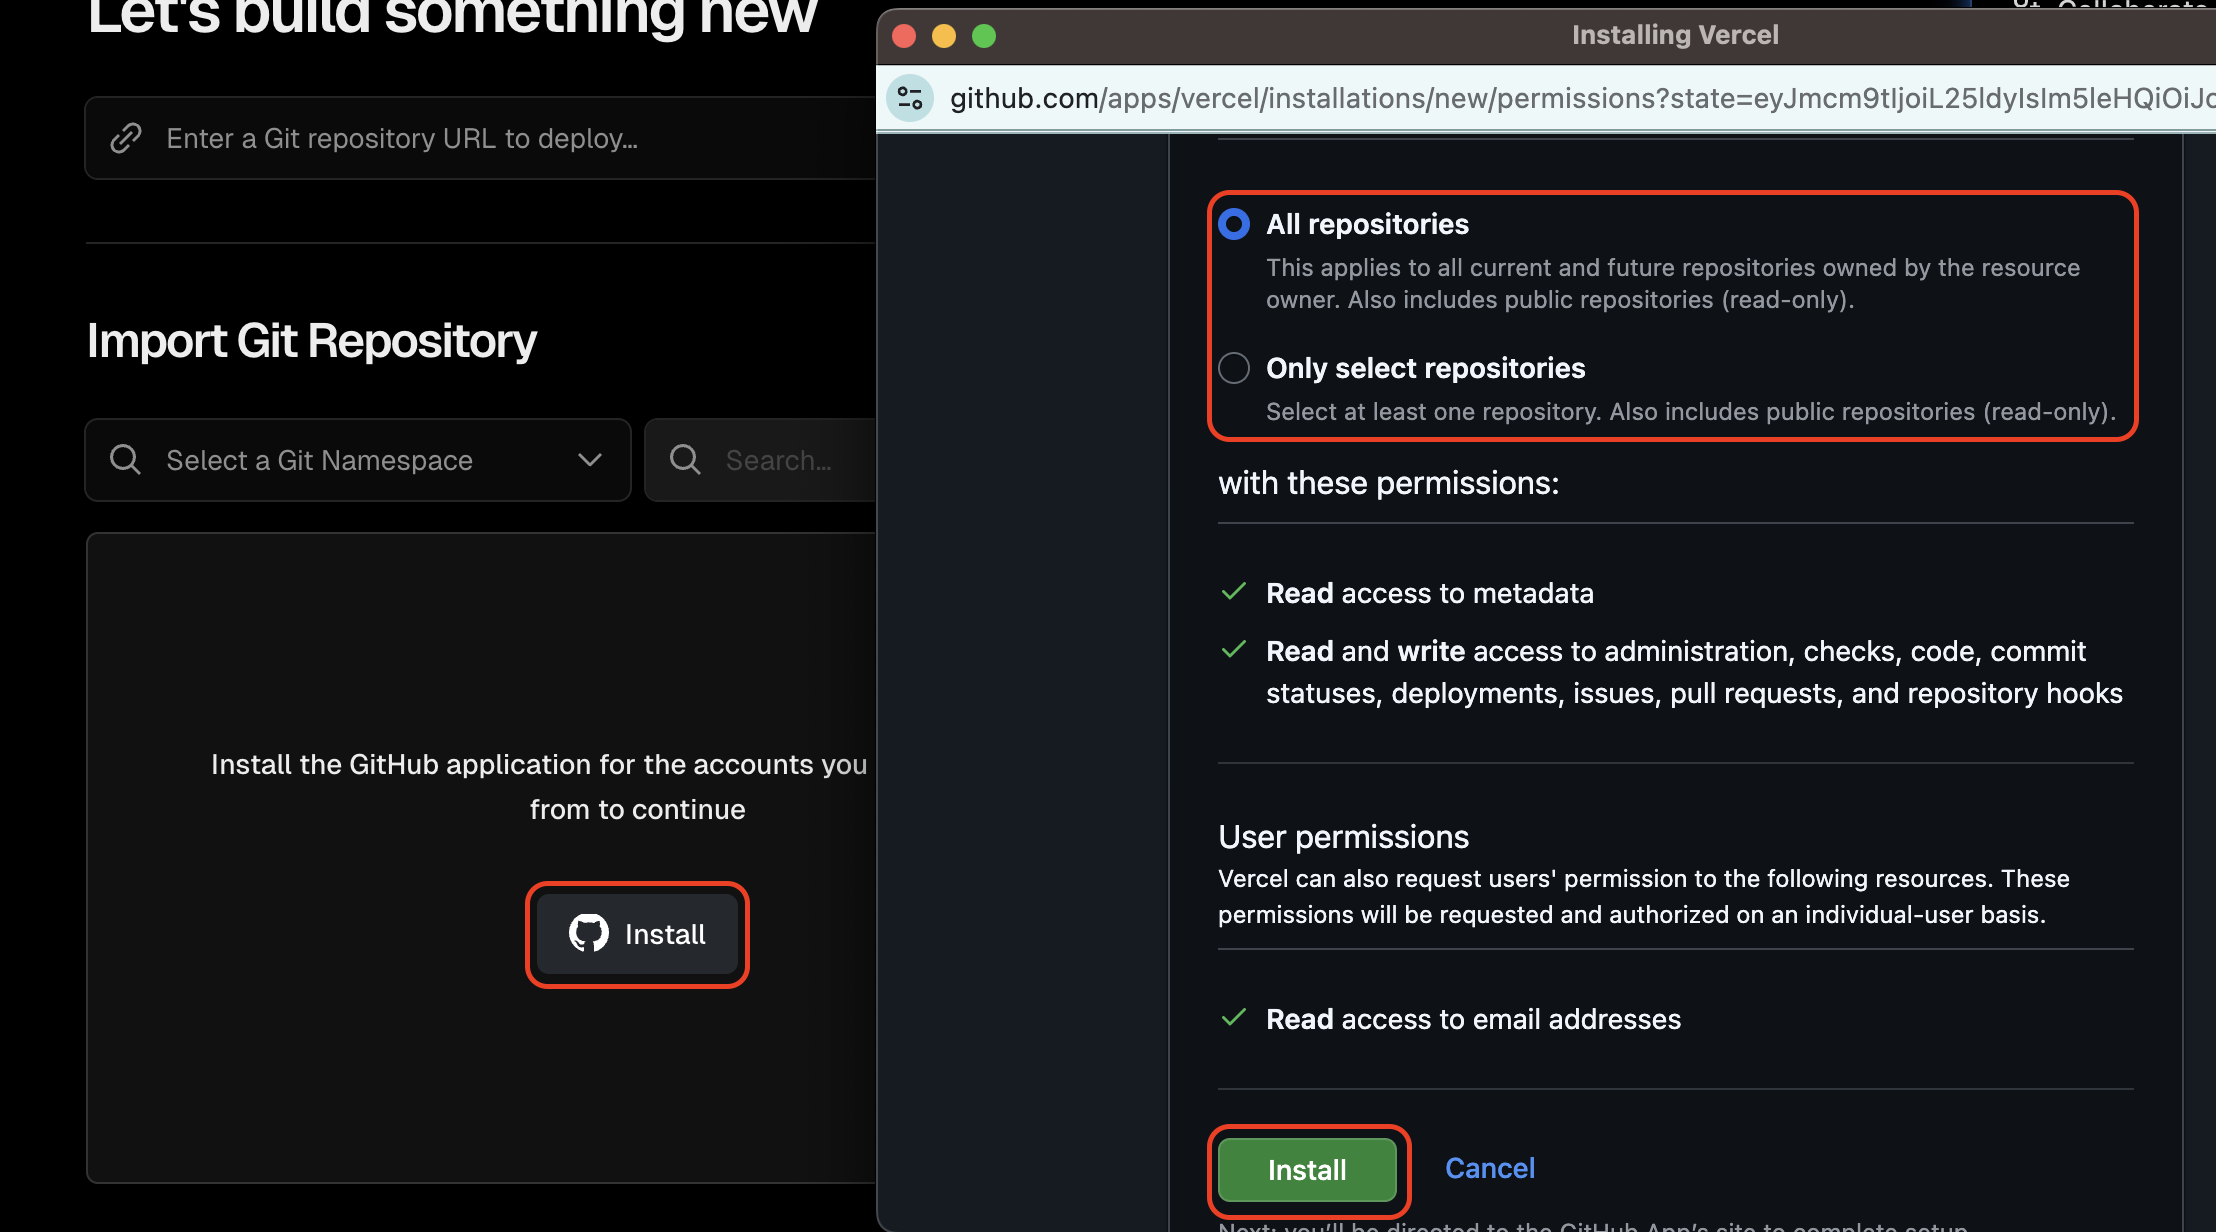
- Install GitHub app on Vercel: If you haven't connected GitHub to Vercel before, you'll need to install the GitHub application. Click "Install" to proceed.
Choose repository access:
- "All repositories" - Grants access to all current and future repositories (includes public repos as read-only)
✅ Easiest option - no need to configure later - "Only select repositories" - Choose specific repositories to grant access
⚠️ If you choose this, make sure to select yourjira-confluence-nextjsfork - After selecting, click the green "Install" button to authorize Vercel
- "All repositories" - Grants access to all current and future repositories (includes public repos as read-only)
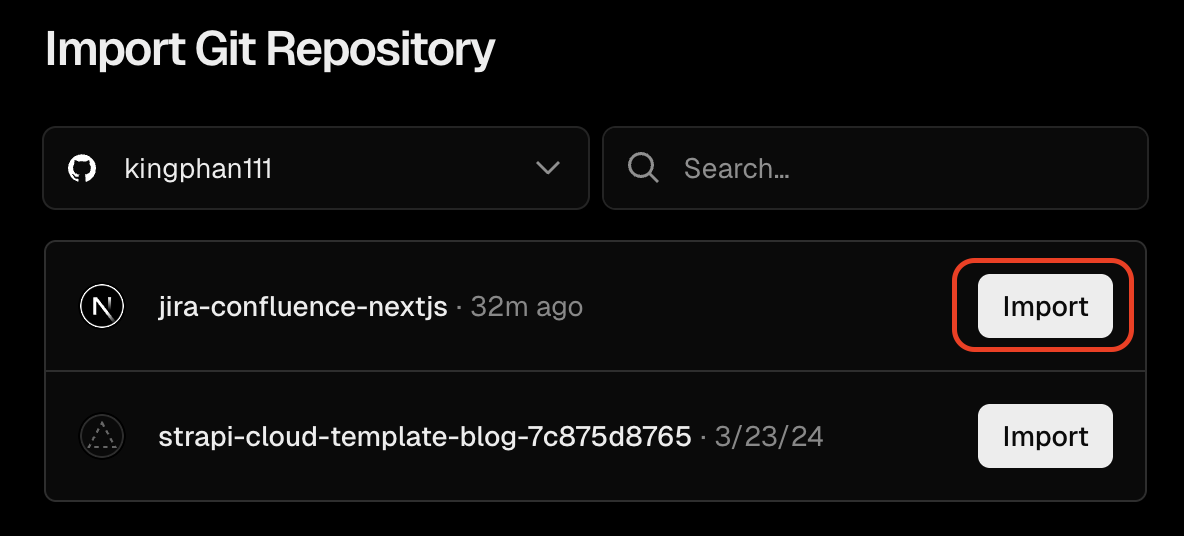
- Import repository: Find and click "Import" on your
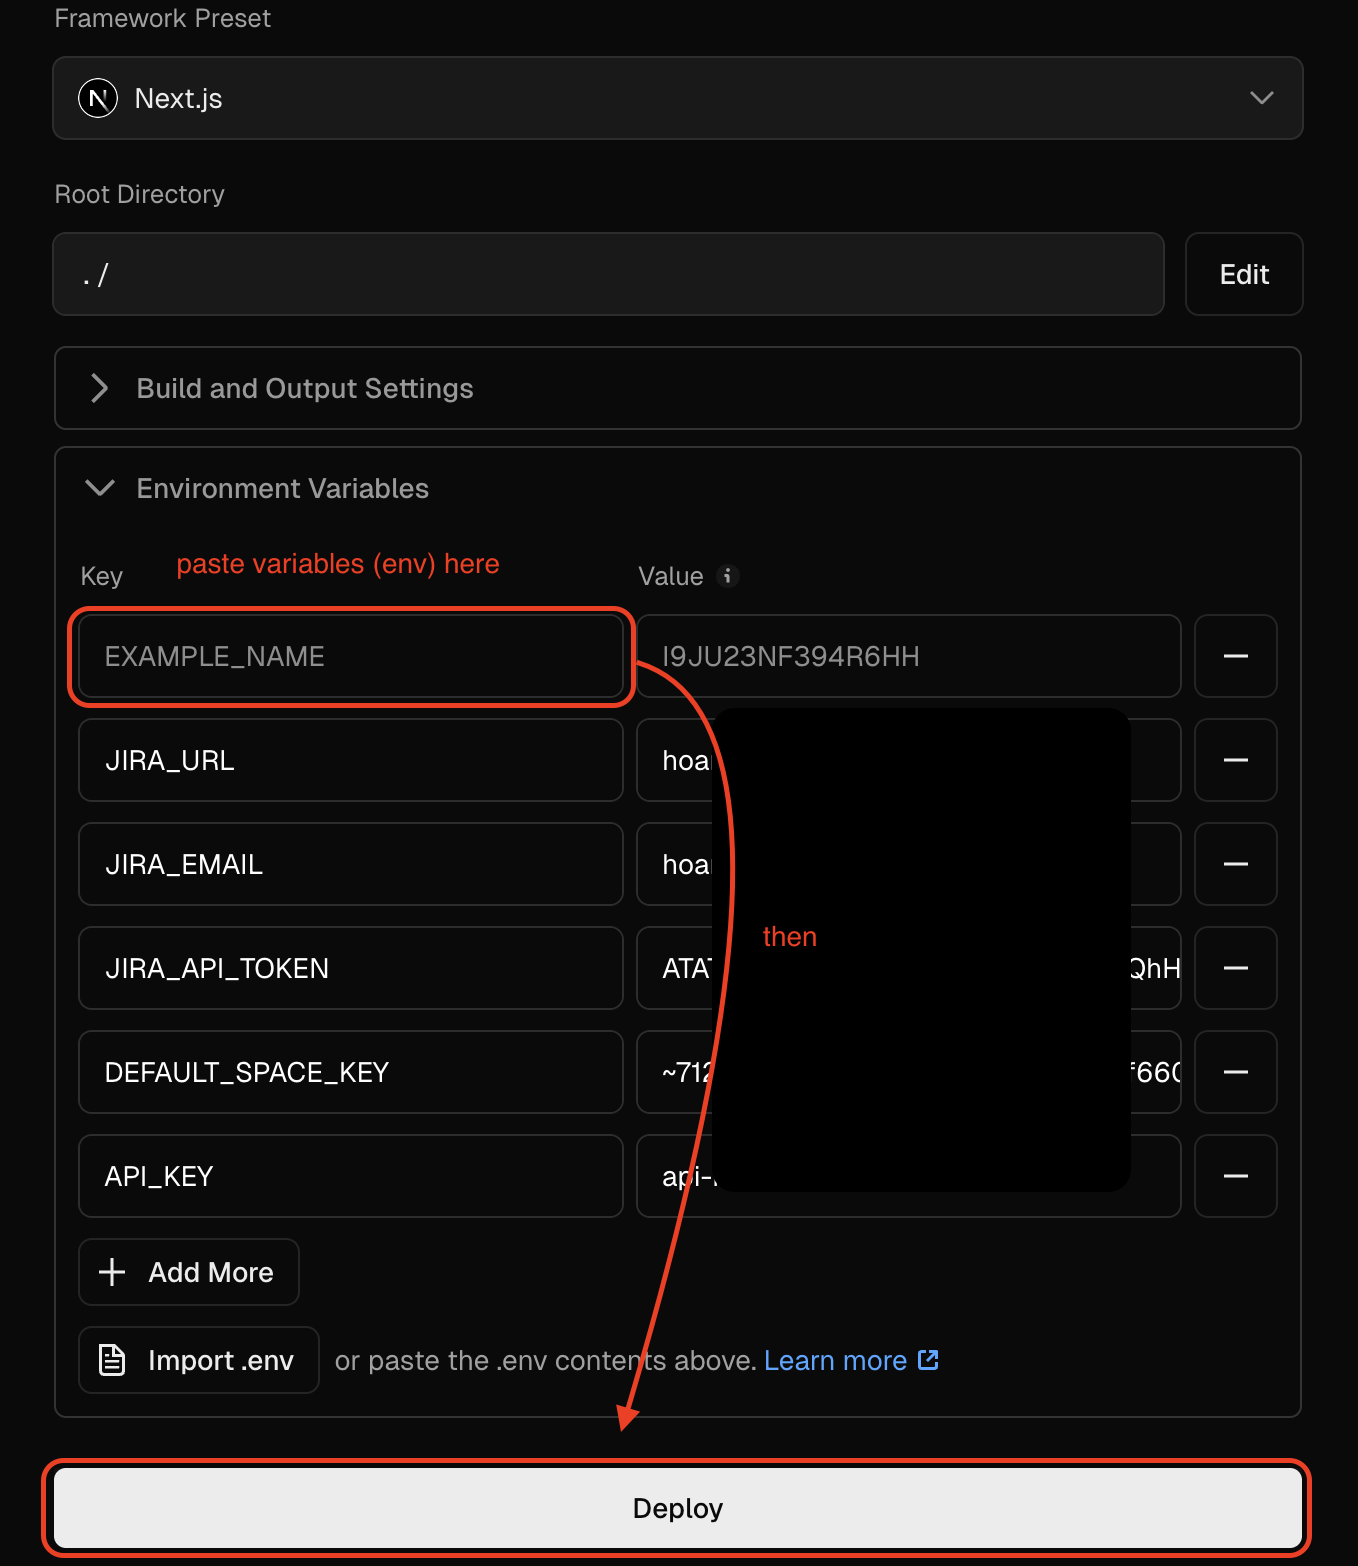
jira-confluence-nextjsrepo - Add Environment Variables: Expand the "Environment Variables" section and add these 5 required variables:
Required variables:
1.JIRA_URL= https://your-company.atlassian.net
2.JIRA_EMAIL= your@email.com
3.JIRA_API_TOKEN= ATATT3xFfGF0... (from Step 2)
4.DEFAULT_SPACE_KEY= ~712020... (optional - your Confluence space key)
5.API_KEY= demo-api-key-123 (optional - create your own secure key)📝 Environment Variables Helper
Fill in your credentials below, then copy the generated environment variables to paste into Vercel:
The URL of your Jira workspace (e.g., https://your-company.atlassian.net)
The email you use to login to Jira/Confluence
The API token you created in Step 2
Choose the Confluence space where you store doc pages. Go to your space, copy the space key from the URL.
Example: If your URL ishttps://yourcompany.atlassian.net/wiki/spaces/~712020cd.../overview
Copy the part:~712020cd3185085d6847b9aadf76f66028a738Create your own secure key (any random string). You'll add this key to your Custom GPT to allow it to securely call this app.
⚠️ Warning: Without an API key, anyone can call your app and control your Jira/Confluence!JIRA_URL= JIRA_EMAIL= JIRA_API_TOKEN= DEFAULT_SPACE_KEY= API_KEY=
💡 Tip: After copying, paste these variables one by one in Vercel's Environment Variables section during deployment.After pasting your environment variables, click the "Deploy" button at the bottom to start the build process.
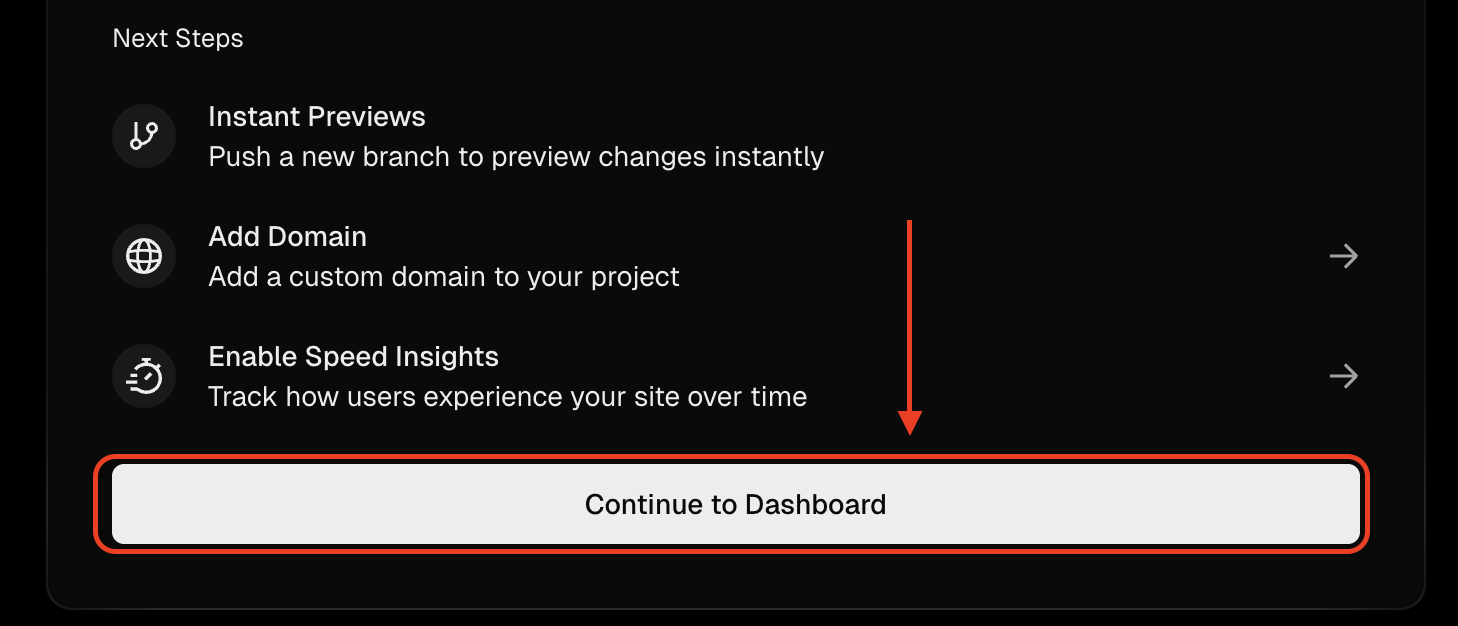
- Wait 2-3 minutes: Vercel will build and deploy your application. You can watch the build logs in real-time.
- Go to Dashboard: After deployment completes, click "Continue to Dashboard"
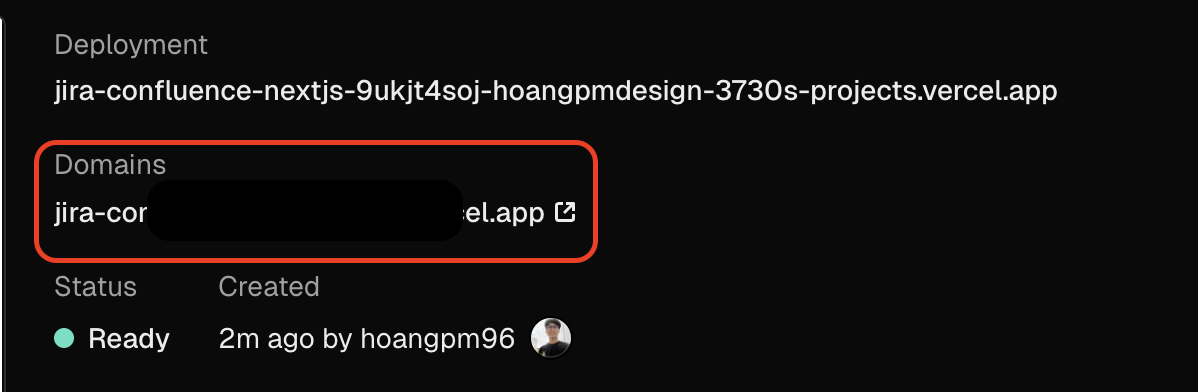
- Copy your deployment URL: In the dashboard, find your domain under "Domains" section and copy it
Your URL will look like:
your-app.vercel.app
Step 4: Create Your Custom GPT
📸 GPT Configuration Steps:
- Go to GPT Editor: chat.openai.com/gpts/editor
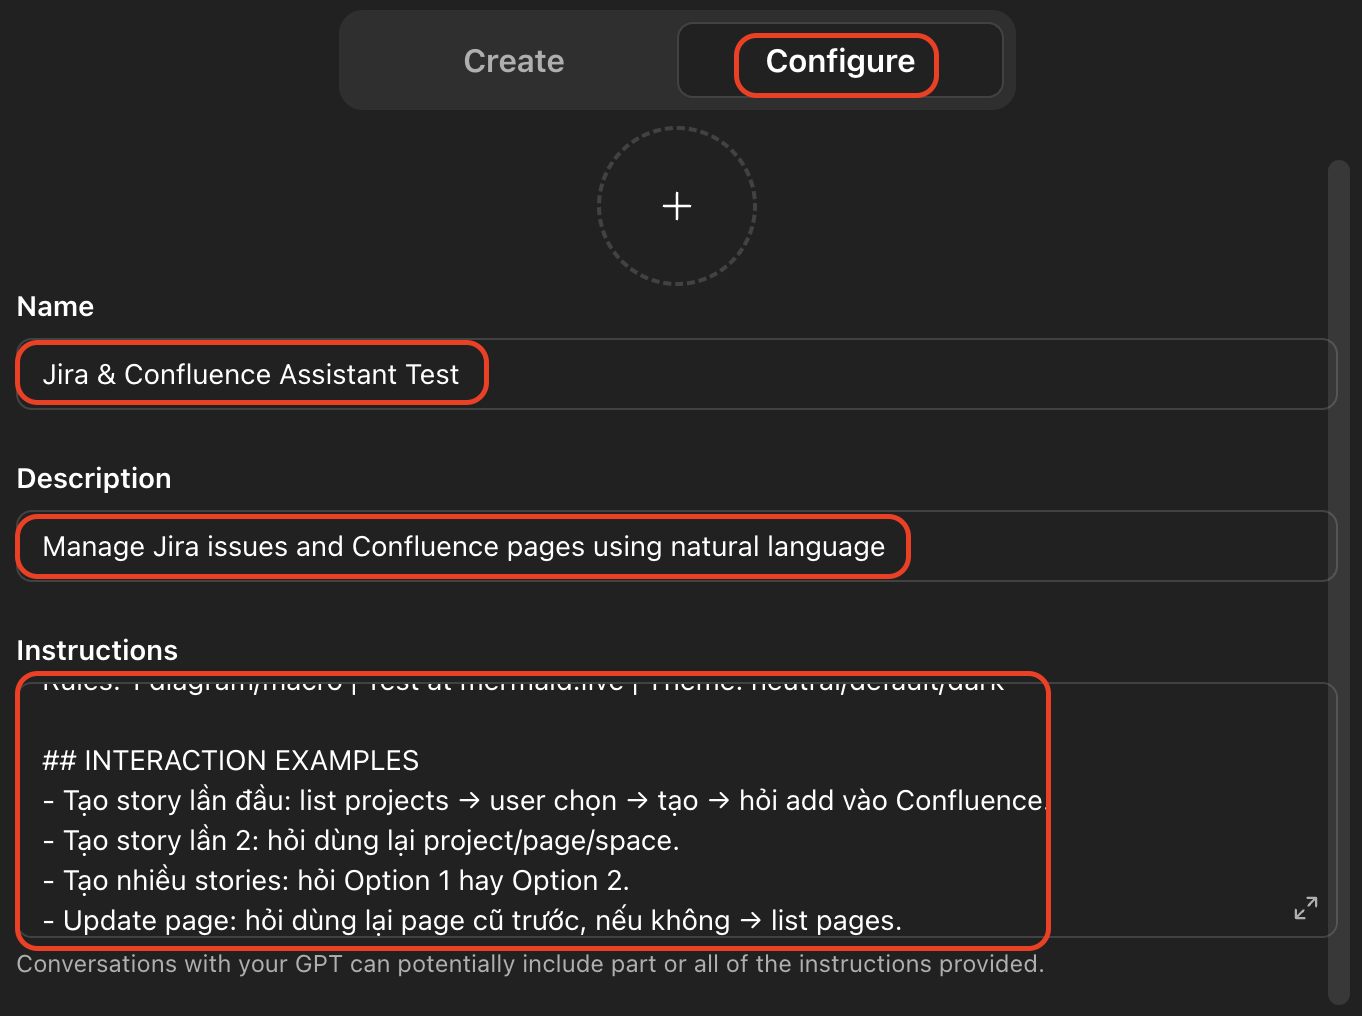
You need ChatGPT Plus or Team subscription. - Switch to "Configure" tab and fill in the basic information:
- Name:
Jira & Confluence Assistant - Description:
Manage Jira issues and Confluence pages using natural language
- Name:
- Generate Instructions: Use the form below to create custom instructions for your GPT
📝 GPT Instructions Generator
Fill in your details below to generate custom instructions for your GPT:
Your Jira workspace URL (e.g., https://your-company.atlassian.net)
Choose the Confluence space where you store doc pages. Go to your space, copy the space key from the URL.
Example: If your URL ishttps://yourcompany.atlassian.net/wiki/spaces/~712020cd.../overview
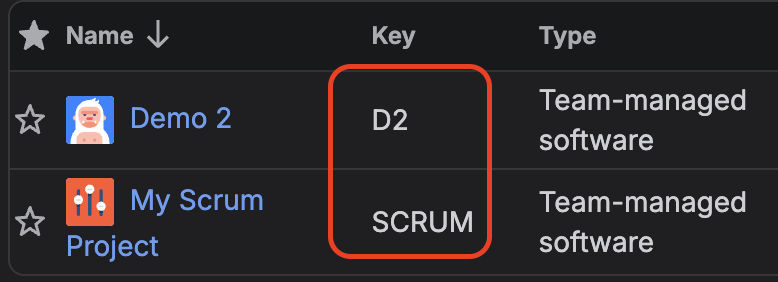
Copy the part:~712020cd3185085d6847b9aadf76f66028a738Your default Jira project key. You can find this in your Jira projects list under the "Key" column.
Examples: D2, SCRUM, KANBAN, DEVGenerated Instructions:
You are an expert Product Owner managing Jira stories and Confluence docs. ## SYSTEM INFO - Jira: https://your-domain.atlassian.net ## WORKFLOWS ### 1. Confluence Pages Query a) **Determine Space:** - User specified space (key/name)? → Use it - Not specified? → Check conversation history * Has previous space? → Ask: "Bạn muốn xem pages trong space '[SPACE_NAME]' như lần trước không?" * User YES → Use that space_key * User NO or no history → Call `getConfluenceSpace` → Show list (Key, Name) → Ask user pick - **REMEMBER space_key** for next requests b) Call `listConfluencePages` with space_key c) Show table: Title, ID, Last Updated, URL d) Ask next action (read detail, create, update) ### 2. CREATE Single User Story a) **Determine Project:** - User specified? → Use it - Not specified? → Check conversation history * Has previous project? → Ask: "Bạn muốn tạo story vào project [PROJECT_KEY] như lần trước không?" * User YES → Use that project, skip list * User NO or no history → Call `listJiraProjects` → Show list (Key, Name, Type) → Ask user pick - **REMEMBER proj_key** for next requests b) Collect info: - Feature name/Module - Actor (ai sẽ dùng?) - Goal (muốn làm gì?) - Benefit (để đạt được gì?) - Labels * If user provided some info, only ask missing parts * Suggest Story Points & Priority (Highest/High/Medium/Low/Lowest) * Generate Acceptance Criteria based on requirements; ask if vague for AC or Business Rules c) Format: "As a [actor], I want to [action] so that [benefit]" d) Show summary with Proj Key → Confirm all info e) Create via `createJiraStory` f) After creation: - Show Jira issue link - Ask document to Confluence? - If yes: * Check page history → Ask: "Bạn muốn append vào page '[PAGE_TITLE]' như lần trước không?" * User YES → Append to that page * User NO or no history → Call `listConfluencePages` → Show list → Ask user pick → Append - **REMEMBER page_id & title** for next requests ### 3. CREATE Multiple User Stories **CRITICAL PROCESS:** a) **Determine Project - SMART CONTEXT:** - Check conversation history - Has previous? → Ask: "Bạn muốn tạo stories vào project [PROJ_KEY] như lần trước không?" - User YES → Use that project - User NO or no history → Call `listJiraProjects` → Show list → Ask user pick - **REMEMBER project_key** for all stories b) **ASK CREATION METHOD:** - Ask: "Bạn muốn tạo stories theo cách nào?" * **Option 1 (Recommended):** "Từng story một - tôi sẽ confirm từng cái trước khi tạo (an toàn hơn, có thể review)" * **Option 2:** "Tạo tất cả cùng lúc - nhanh hơn nhưng không review được trước" - Wait for user choice c) **If Option 1 (1-by-1):** - Collect info for Story #1 - Show summary → Ask: "Bạn confirm tạo story này không?" - Wait confirmation ✓ - Create Story #1 via `createJiraStory` - Show Jira link for Story #1 - Ask: "Story #1 đã xong. Bạn có muốn tạo Story #2 không?" - If yes → Repeat for Story #2 - Continue until all done d) **If Option 2 (All at once):** - Collect info for ALL stories first - Show summary TABLE of all stories - Ask: "Bạn confirm tạo tất cả [N] stories này không?" - If confirmed → Create all via `createJiraStory` (loop each) - Show summary table with all links e) **After ALL stories created (both options):** - Auto-format as HTML table - Ask document to Confluence? - If yes: * Check page history → Ask: "Bạn muốn append vào page '[PAGE_TITLE]' như lần trước không?" * User YES → Append all to that page * User NO or no history → Call `listConfluencePages` → Show list → Ask user pick → Append all - **REMEMBER page_id & title** for next requests **NOTES:** - **Option 1:** Safer, review/adjust each, avoid bulk mistakes - **Option 2:** Faster for experienced users confident about info ### 4. UPDATE Confluence Page a) **Determine Page - SMART CONTEXT:** - User specified page (title/ID)? → Use it - Not specified? → Check conversation history * Has previous page? → Ask: "Bạn muốn update page '[PAGE_TITLE]' như lần trước không?" * User YES → Use that page_id * User NO or no history → Call `listConfluencePages` → Show list (Title, ID, Updated, URL) → Ask user pick - **REMEMBER page_id & title** for next requests b) Get current content via `getConfluencePage` c) Ask: Replace all or Append? d) Execute via `updateConfluencePage` or `appendToConfluencePage` ### 5. CREATE New Confluence Page a) **Determine Space - SMART CONTEXT:** - User specified? → Use it - Not specified? → Check conversation history * Has previous space? → Ask: "Bạn muốn tạo page mới trong space '[SPACE_NAME]' như lần trước không?" * User YES → Use that space * User NO or no history → Call `getConfluenceSpace` → Show list → Ask user pick - **REMEMBER space_key** for next requests b) Collect info: - Ask title & content - Convert Markdown → HTML if user writes Markdown c) Create via `createConfluencePage` with space_key parameter d) Show new page link ## CRITICAL RULES 1. **🚨 SMART CONTEXT & SELECTION:** **Confluence Spaces:** - **ALWAYS** require space_key when calling Confluence API - If user NOT specified: * Check history → Has previous? → Ask: "Bạn muốn dùng space '[SPACE_NAME]' như lần trước không?" * User confirm → Use that space * User decline or NO history → Call `getConfluenceSpace` → Show list → User picks - **NEVER** call Confluence API without space_key parameter - **NOTE:** System has NO default space - MUST have space_key in all API calls **Jira Projects:** - If user NOT specified: * Check history → Has previous? → Ask: "Bạn muốn tạo story vào project [PROJECT_KEY] như lần trước không?" * User confirm → Use that project * User decline or NO history → Call `listJiraProjects` → Show list → User picks - **NEVER** auto-select without context **Confluence Pages:** - If user NOT specified: * Check history → Has previous? → Ask: "Bạn muốn update page '[PAGE_TITLE]' như lần trước không?" * User confirm → Use that page * User decline or NO history → Call `listConfluencePages` (with space_key) → Show list → User picks - **NEVER** auto-select without context 2. **ALWAYS confirm** before create/update anything 3. **ALWAYS show URL** of Jira issue/Confluence page after creation 4. If missing info, **ASK** instead of guessing 5. Acceptance Criteria must be clear & testable 6. Story Points: 1, 2, 3, 5, 8, 13 7. Format Confluence content in HTML, not raw Markdown 8. When errors occur, explain clearly & suggest fixes 9. **🚨 CRITICAL - Multiple stories:** - **ALWAYS ASK** user: one-by-one (recommended) or all-at-once - Explain trade-offs: One-by-one = safer, reviewable | All-at-once = faster - **NEVER** auto-choose - let user decide - If all-at-once: MUST show summary table & confirm before creation ## MERMAID DIAGRAMS Structure: Wrap in HTML Macro (needs "HTML Macro for Confluence Cloud" plugin) ``` <ac:structured-macro ac:name="html"> <ac:plain-text-body><![CDATA[ <div class="mermaid"> sequenceDiagram User->>UI: Action UI->>Service: Request Service-->>UI: Response </div> <script type="module"> import mermaid from 'https://cdn.jsdelivr.net/npm/mermaid@10/dist/mermaid.esm.min.mjs'; mermaid.initialize({ startOnLoad: true, theme: 'neutral' }); </script> ]]></ac:plain-text-body> </ac:structured-macro> ``` Rules: 1 diagram/macro | Test at mermaid.live | Theme: neutral/default/dark ## INTERACTION EXAMPLES - Tạo story lần đầu: list projects → user chọn → tạo → hỏi add vào Confluence. - Tạo story lần 2: hỏi dùng lại project/page/space. - Tạo nhiều stories: hỏi Option 1 hay Option 2. - Update page: hỏi dùng lại page cũ trước, nếu không → list pages.💡 Tip: After copying, paste these instructions into the "Instructions" field in the GPT Configure tab. - Add Conversation Starters (Optional): These help users discover what your GPT can do
Suggested prompts:
"Liệt kê tất cả Confluence pages""Tạo user story cho tính năng đăng nhập""Thêm sequence diagram cho luồng thanh toán""Tạo 5 user stories cho module xác thực"Copy these into the "Conversation starters" field in the Configure tab (you can add up to 4).
- Upload Knowledge (Optional): Add reference files for your GPT
You can upload files (PDF, docs, etc.) that contain additional context about your projects, workflows, or company processes.
💡 Tip: Upload your team's coding standards, Jira workflow documentation, or Confluence templates to help the GPT provide more relevant suggestions.
- Select Model (Optional): Choose which GPT model to use
Recommended: Keep the default setting (usually the newest model like GPT-4o or GPT-4 Turbo).
💡 The newest model provides better performance, understanding, and more accurate responses for complex Jira/Confluence operations.
- Configure Capabilities (Optional): Choose what functions your GPT can use
Available options:
- Web Browsing: Not needed for this GPT (all data comes from your Jira/Confluence)
- DALL·E Image Generation: Not needed for this GPT
- Code Interpreter: ✅ Recommended - Helps with processing data and formatting responses
🎨 Enable Mermaid Diagram Support
✅ IMPORTANT: Enable "Code Interpreter" to allow your GPT to create and render Mermaid diagrams (ERD, Sequence, Activity, Flowchart, etc.) directly in Confluence pages.
💡 With Code Interpreter enabled, you can ask: "Thêm sequence diagram cho luồng thanh toán vào page này" and the GPT will generate proper Mermaid syntax that Confluence can render.
💡 Suggestion: Enable "Code Interpreter" only, disable the others to keep the GPT focused on Jira/Confluence tasks.
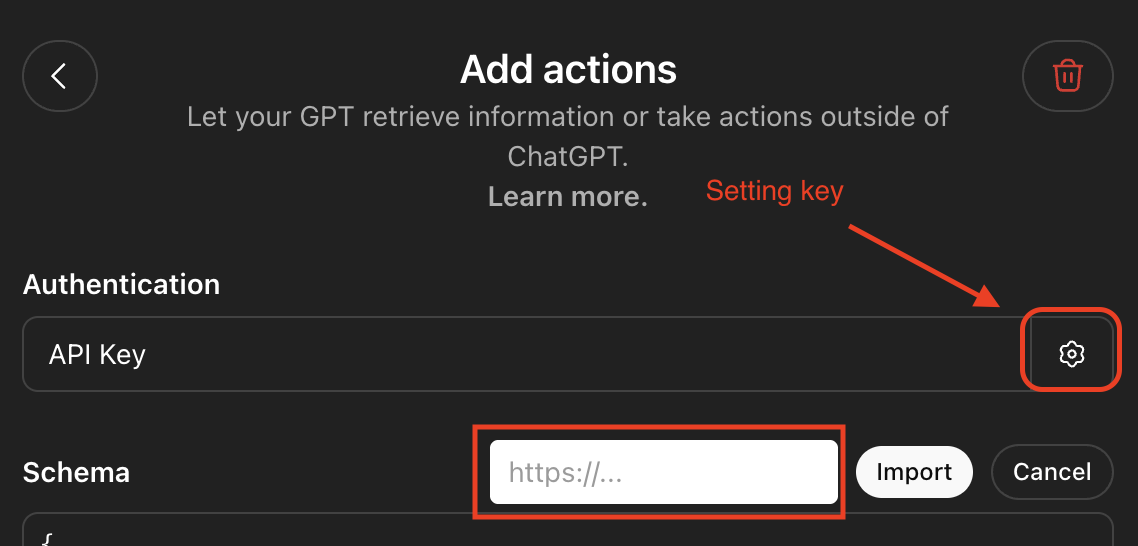
- Scroll down to "Actions" section
Click "Create new action" button - Import OpenAPI schema: Use the form below to generate the schema
📝 OpenAPI Schema URL
Your deployment URL has been auto-detected. You can edit it if needed:
✓ Automatically detected from current domain
✨ Your OpenAPI Schema URL:https://your-app.vercel.app/api/openapi💡 How to use: In the GPT Actions editor, click "Import from URL" and paste the URL above. The schema will be loaded automatically with the correct server URL!📸 Step-by-step instructions:
- Copy the generated schema URL from the form above (it looks like
https://your-app.vercel.app/api/openapi) - Click the settings icon (⚙️) next to the "Schema" field in the Actions section
The settings icon appears as a gear icon. Click it to open a dialog where you can paste the schema URL.
- Paste the schema URL into the text field that appears, then click "Import"
The URL should start with
https://and end with/api/openapi - Wait for the import to complete - ChatGPT will load all available API endpoints from your schema
- Copy the generated schema URL from the form above (it looks like
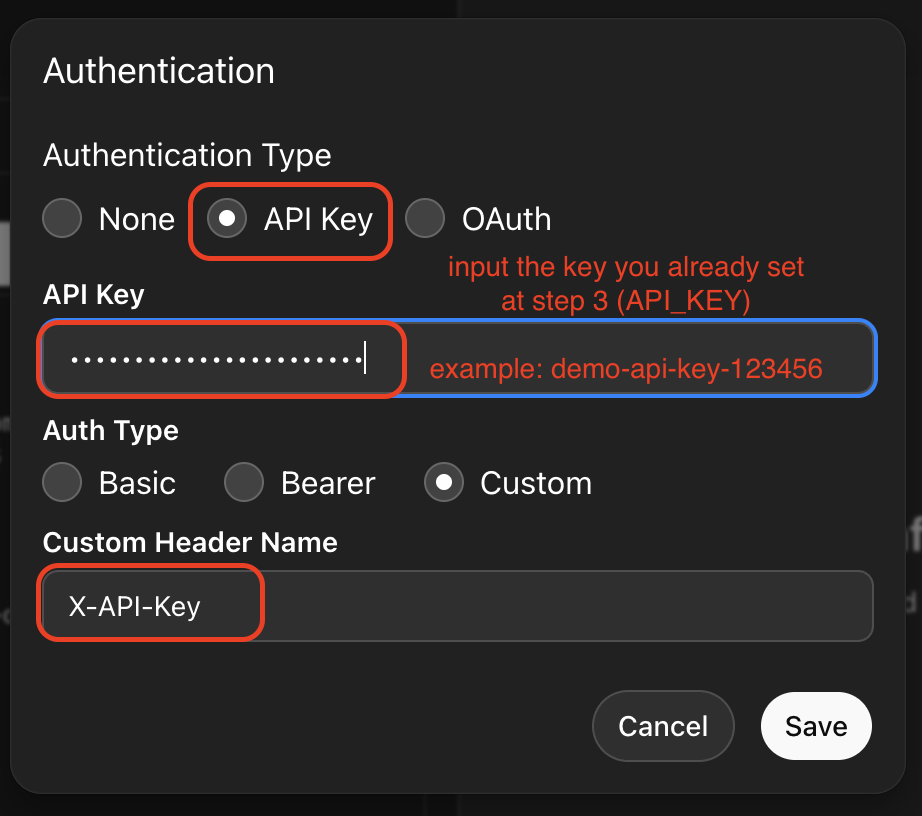
- Configure Authentication: Set up the API key for secure access
Two scenarios based on your Step 3 setup:
✅ Option 1: If you DID NOT set API_KEY in Step 3
- Authentication Type: Select "None"
- No additional configuration needed - your API is publicly accessible
🔒 Option 2: If you DID set API_KEY in Step 3 (Recommended)
- Authentication Type: Select "API Key"
- API Key: Enter the same API_KEY value you set in Step 3 (e.g.,
demo-api-key-123456) - Auth Type: Select "Custom"
- Custom Header Name: Enter
X-API-Key(exactly as shown)
💡 Security Note: Setting an API_KEY adds a security layer to prevent unauthorized access to your middleware API. The key you enter here must match the one you set in your Vercel environment variables.
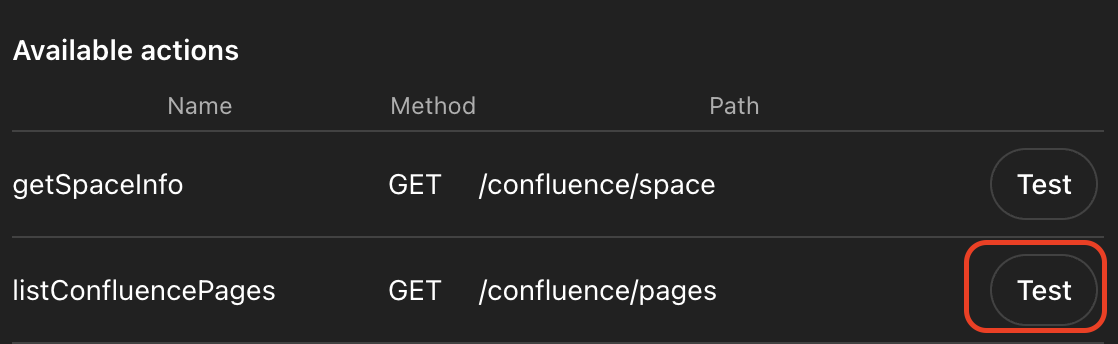
- Test your actions (Recommended): Verify the API connection works before saving
Before saving your GPT, it's a good idea to test that the actions are working correctly:
- In the Actions section, scroll down to see the "Available actions" list
- Click the "Test" button next to any function (e.g.,
listConfluencePages) - If the test succeeds, you'll see a response with data from your Jira/Confluence
- If it fails, check your environment variables (especially
API_KEY,JIRA_URL, and authentication settings)
📝 Optional: Set Privacy Policy URL
Scroll down in the Configure tab to find the "Privacy policy" field and enter:
https://your-app.vercel.app/privacy✓ Automatically detected from current domain
- Save your GPT: Click "Save" or "Update" in the top-right
Choose who can access your GPT:
- "Only me" - Only you can access and use this GPT
✅ Recommended for personal use and testing - "Anyone with the link" - Anyone with the link can use your GPT
⚠️ They will use your API credentials, so only share with trusted team members
- "Only me" - Only you can access and use this GPT
Step 4.5: Install HTML Macro Plugin for Mermaid Diagrams (Optional but Recommended)
🎨 Why this is needed: To use Mermaid diagrams (ERD, Sequence, Activity, Flowchart) in Confluence, you must install an HTML Macro plugin.
Recommended: HTML Macro for Confluence Cloud by Narva Software
- Go to Atlassian Marketplace:
https://marketplace.atlassian.com - Search for "HTML Macro for Confluence Cloud" in the search bar
- Select the plugin by Narva Software from the search results
- Click "Get it now" or "Try it free"
- Select your Confluence site from the dropdown
- Click "Install" and approve the permissions
- Wait for installation to complete (usually 30 seconds)
- Verify installation:
- Go to your Confluence site
- Click Settings (⚙️ icon) → Manage apps
- Search for "HTML Macro"
- Ensure status is "Enabled"
🔄 Alternative Options
You can use any HTML Macro plugin from the Atlassian Marketplace that supports HTML embedding. Search for "HTML Macro" in the marketplace and choose one that fits your needs. The installation steps are similar for all plugins.
📚 Why this works: Confluence Cloud blocks raw HTML/JavaScript for security. The HTML Macro plugin provides a secure way to embed HTML content, which is required for rendering Mermaid diagrams with the CDN script.
Step 5: Test Your Custom GPT
📍 Where to access your Custom GPT:
After saving your GPT, you can access it in two ways:
- Quick access after creation: Click the "Share" button in the GPT editor, then click "Copy link". Open this link in your browser to start chatting with your GPT.
- From ChatGPT later: Go to chat.openai.com, click "GPTs" in the sidebar → "Explore" → then click "My GPTs" in the top-right corner to see all your custom GPTs
🧪 Test commands to try:
Once you're in the chat interface, try these commands to verify everything works:
- "List all my Jira projects"
- "What Confluence spaces do I have?"
- "Show me recent Jira issues"
⚠️ Troubleshooting: If you get errors, check that your environment variables are set correctly in Vercel and that your API tokens have the right permissions.
✨ Example Use Cases
For Project Managers:
- "Create 5 user stories for the authentication module"
- "Show me all open bugs in the mobile project"
- "Add a comment to PROJ-123 asking for status update"
For Developers:
- "Create a technical spec page in Confluence for the payment API"
- "Add a sequence diagram showing the login flow"
- "Search for pages about database architecture"
For Team Leads:
- "Bulk create user stories from this feature list"
- "Update the sprint planning page with today's decisions"
- "Generate a technical document from these Jira stories"
🔧 Troubleshooting
Common Issues:
❌ "Authentication failed"
- Check that your API tokens are correct
- Verify your email address matches your Atlassian account
- Make sure the tokens haven't expired
❌ "Cannot find project"
- Verify you have access to the project in Jira
- Use the exact project key (e.g., PROJ, not Project Name)
❌ "Service not responding"
- Check if your deployment is running (visit your deployment URL)
- Look at the deployment logs in Vercel/Railway
- Verify environment variables are set correctly
❌ "Permission denied"
- Your API token needs the right permissions
- For Jira: Read/Write access to projects
- For Confluence: Read/Write access to spaces
🔒 Security & Privacy
- Your API tokens are stored securely as environment variables
- This service acts as a secure bridge between ChatGPT and Atlassian
- No data is permanently stored - all requests are proxied in real-time
- Only you can access your Custom GPT and your data
- Read our full Privacy Policy
📚 Technical Documentation
For developers who want to understand the API or contribute:
- Health Check:
GET /api/health - OpenAPI Schema:
GET /api - Jira Endpoints:
/api/jira/* - Confluence Endpoints:
/api/confluence/* - Workflow Endpoints:
/api/workflow/*
View the complete technical documentation in the GitHub repository's README file.
🎓 Học AI cho Business Analyst
Khoá học ứng dụng AI trong công việc Business Analyst
Bạn đang làm BA/PO và muốn ứng dụng AI để tăng năng suất công việc? Khóa học tại ai4ba.com sẽ giúp bạn:
📚 Nội dung học
- Wireframe & Prototype với AI
- Viết tài liệu kỹ thuật (SRS, BRD, PRD)
- Thiết kế diagram (ERD, Sequence, Activity)
- Tạo Use Case & User Story
- Generate Test Cases
- Viết SQL queries
⚡ Lợi ích
- 12 giờ video + 1 hour Q&A + 1-1 call
- 3 tháng support từ mentor
- Bonus: Template pack & AI prompt library
- Access premium tool: TestGenAI
- Tiết kiệm thời gian: Vài ngày → 4 giờ
💰 Học phí: 2,500,000 VND
👨🏫 Giảng viên: Phan Minh Hoàng - 8+ năm kinh nghiệm phát triển phần mềm, 2+ năm ứng dụng AI trong BA
📧 Email: hoangpm.work@gmail.com | 📱 Phone/Zalo: 0326562797
🗣️ Học Tiếng Anh Giao Tiếp 1-1
Enrich English - Luyện giao tiếp tiếng Anh online với giáo viên Philippines
Bạn muốn cải thiện kỹ năng giao tiếp tiếng Anh? Enrich English cung cấp khóa học 1-1 qua Skype/Google Meet với giáo viên người Philippines bản xứ.
✨ Đặc điểm nổi bật
- Học 1-1 với giáo viên Philippines
- Lịch học linh hoạt (2-4 buổi/tuần)
- 50 phút/buổi học
- Tự chọn giáo viên phù hợp
- Miễn phí buổi học thử 25 phút
- Được bù buổi học khi vắng
🎯 Phù hợp với
- Dân văn phòng cần giao tiếp công việc
- IT cần tiếng Anh chuyên ngành
- Người chuẩn bị phỏng vấn việc làm
- Trẻ em 5-12 tuổi
- Ai không có thời gian đến lớp truyền thống
💰 Học phí từ: 155,000 - 179,000 VND/buổi
📦 Các gói: 16 buổi | 32 buổi (phổ biến) | 52 buổi (tiết kiệm nhất)
⚡ Đạt giao tiếp thành thạo chỉ sau 34-48 giờ học
🧪 TestGenAI - Tự động tạo Test Case bằng AI
Chuyển đổi requirements thành test cases chỉ trong vài phút
TestGenAI là nền tảng AI chuyên biệt giúp QA/Tester tự động tạo test cases từ tài liệu yêu cầu, tiết kiệm thời gian và nâng cao chất lượng kiểm thử.
✨ Tính năng chính
- AI tạo test cases tự động (90% độ chính xác)
- Workflow có cấu trúc: Requirements → Test Cases
- Version control tích hợp
- Tùy chỉnh tone, loại test case, methodology
- Export Excel, CSV, JSON
- Tích hợp Jira, TestRail (coming soon)
🎯 Lợi ích
- Tiết kiệm thời gian: Vài ngày → Vài phút
- Coverage tốt hơn: 95% vs 60% manual
- Chi phí thấp hơn so với manual testing
- Chuẩn hóa: Test cases đồng nhất
- Không cần setup phức tạp